버츄얼 디바이스 켜기
1. Fragment3
View1_Fragment3_QuizGame 프로젝트 만들기
※ 페이지 이동
1) Intent 객체 생성
2) 데이터 저장(Intent 객체에 저장) - putExtra();
3) startActivity(intent);
가고자 하는 클래스명 뒤에 반드시 .class를 붙인다.
- activity_main.xml
<?xml version="1.0" encoding="utf-8"?>
<LinearLayout xmlns:android="http://schemas.android.com/apk/res/android"
    xmlns:app="http://schemas.android.com/apk/res-auto"
    xmlns:tools="http://schemas.android.com/tools"
    android:layout_width="match_parent"
    android:layout_height="match_parent"
    android:orientation="vertical"
    android:background="#ECECB8"
    tools:context=".MainActivity">

    <TextView
        android:layout_width="match_parent"
        android:layout_height="wrap_content"
        android:layout_marginTop="200dp"
        android:gravity="center"
        android:text="퀴즈 앱입니다."
        android:textColor="#000"
        android:textSize="40dp" />

    <Button
        android:id="@+id/start"
        android:layout_width="wrap_content"
        android:layout_height="wrap_content"
        android:layout_gravity="center"
        android:layout_marginTop="100dp"
        android:backgroundTint="#2196F3"
        android:text="시작"
        android:textSize="15dp" />

</LinearLayout>
- MainActivity.java
package com.example.view1_fragment3_quizgame;

import android.content.Intent;
import android.os.Bundle;
import android.view.View;
import android.widget.Button;

import androidx.appcompat.app.AppCompatActivity;

public class MainActivity extends AppCompatActivity {

    Button startButton;

    @Override
    protected void onCreate(Bundle savedInstanceState) {
        super.onCreate(savedInstanceState);
        setContentView(R.layout.activity_main);

        startButton = findViewById(R.id.start);
        startButton.setOnClickListener(new View.OnClickListener() {
            @Override
            public void onClick(View v) {
                //페이지 이동
                Intent intent = new Intent(MainActivity.this, QuizStartActivity.class);
                startActivity(intent);
            }
        });
    }

}
- QuizStartActivity.java
package com.example.view1_fragment3_quizgame;

import android.content.DialogInterface;
import android.content.Intent;
import android.os.Bundle;
import android.view.View;
import android.widget.Button;

import androidx.appcompat.app.AlertDialog;
import androidx.appcompat.app.AppCompatActivity;
import androidx.fragment.app.Fragment;
import androidx.fragment.app.FragmentManager;
import androidx.fragment.app.FragmentTransaction;


public class QuizStartActivity extends AppCompatActivity implements View.OnClickListener{

    Button next;
    Fragment fragment;
    int prob_count = 1;

    @Override
    protected void onCreate(Bundle savedInstanceState) {
        super.onCreate(savedInstanceState);
        setContentView(R.layout.quiz_start);
        //프래그먼트 객체 생성
        fragment = new Quiz1Fragment();
        //트랜잭션 처리 메서드
        transit(fragment);

        next = findViewById(R.id.next);
        next.setOnClickListener(this);
    }


    @Override
    public void onClick(View v) {
        prob_count++;

        if(prob_count==2) {
            fragment = new Quiz2Fragment();
            transit(fragment);
        }
        else if(prob_count==3) {
            fragment = new Quiz3Fragment();
            transit(fragment);
        }
        else if(prob_count==4) {
            fragment = new Quiz4Fragment();
            transit(fragment);
        }
        else if(prob_count==5) {
            fragment = new Quiz5Fragment();
            transit(fragment);
            next.setText("Submit");
        }else if(prob_count==6) {//경고 다이얼로그 생성
            AlertDialog.Builder builder = new AlertDialog.Builder(this);
            builder.setTitle("점수 기능을 추가해보세요: ");
            builder.setMessage("5점");
            builder.setPositiveButton("Ok", new DialogInterface.OnClickListener() {
                @Override
                public void onClick(DialogInterface dialog, int which) {
                    finish();
                    Intent intent = new Intent(QuizStartActivity.this, MainActivity.class);
                    startActivity(intent);
                }
            });
            AlertDialog alertDialog = builder.create();
            alertDialog.show();
        }
    }

    /**
     * 프래그먼트 트랜잭션 처리
     * @param fragment
     */
    void transit(Fragment fragment) {
        //1. 프래그먼트 매니저
        FragmentManager manager = getSupportFragmentManager();
        //2. 트랜잭션
        FragmentTransaction transaction = manager.beginTransaction();
        //3. 교체
        transaction.replace(R.id.framelayoutid,fragment);
        //4. 커밋
        transaction.commit();
    }

}
이외 각 클래스와 xml파일을 만들어 각 문제에 대한 로직을 구현했다.
각 xml 파일은 프래그먼트로 구현했다.
- AndroidManifest.xml
<?xml version="1.0" encoding="utf-8"?>
<manifest xmlns:android="http://schemas.android.com/apk/res/android"
    package="com.example.view1_fragment3_quizgame">

    <application
        android:allowBackup="true"
        android:icon="@mipmap/ic_launcher"
        android:label="@string/app_name"
        android:roundIcon="@mipmap/ic_launcher_round"
        android:supportsRtl="true"
        android:theme="@style/Theme.View1_Fragment3_QuizGame">
        <activity
            android:name=".MainActivity"
            android:exported="true">
            <intent-filter>
                <action android:name="android.intent.action.MAIN" />

                <category android:name="android.intent.category.LAUNCHER" />
            </intent-filter>
        </activity>
        <!--이동할 페이지 등록-->
        <activity android:name="QuizStartActivity" android:label="QuizStartActivity"></activity>
    </application>

</manifest>
이용할 페이지를 등록했다.

2. 어댑터 뷰 - 리스트 뷰(레이아웃X)
View2_AdapterView_ListView1_notLayout 프로젝트 만들기
어댑터뷰 : 화면에 동적으로 변경되는 컨텐츠를 채울 때 사용하는 것이 좋다.
특히 배열, 파일, 데이터베이스에 저장된 데이터 읽어서 화면 표시시 유용하게 사용하는 View.
종류) XML에서 ListView, GridView, Spinner, Gallery
구현)
1) XML에 ListView 구현
(1) Java에서 데이터 설정
(2) Adapter를 생성(데이터를 매핑)
(3) 뷰에 Adapter를 설정 - setAdapter()
(4) 이벤트 리스트 추가
- activity_main.xml
<?xml version="1.0" encoding="utf-8"?>

<LinearLayout xmlns:android="http://schemas.android.com/apk/res/android"
    android:orientation="vertical"
    android:layout_width="match_parent"
    android:layout_height="match_parent">

    <TextView
        android:layout_width="wrap_content"
        android:layout_height="wrap_content"
        android:layout_gravity="center_horizontal"
        android:layout_marginTop="30dp"
        android:text="ListView학습"
        android:textSize="25sp"
        android:textStyle="bold"/>

    <!--리스트 뷰에 어댑터 구현-->
    <ListView
        android:id="@+id/listView"
        android:layout_width="match_parent"
        android:layout_height="wrap_content"
        android:layout_gravity="center"/>

</LinearLayout>
- MainActivity.java
package com.example.view2_adapterview_listview1_notlayout;

import android.os.Bundle;
import androidx.appcompat.app.AppCompatActivity;
import android.view.View;
import android.widget.AdapterView;
import android.widget.ArrayAdapter;
import android.widget.ListView;
import android.widget.Toast;

public class MainActivity extends AppCompatActivity {

    @Override
    protected void onCreate(Bundle savedInstanceState) {
        super.onCreate(savedInstanceState);
        setContentView(R.layout.activity_main);
        setTitle("리스트뷰 테스트");
        ListView list = findViewById(R.id.listView);
        //리스트 목록
        final String[]  mid =  {
            "히어로즈", "24시", "로스트", "로스트룸", "스몰빌", "탐정몽크",
            "빅뱅이론", "프렌즈", "덱스터", "글리", "가쉽걸", "테이큰", "슈퍼내추럴", "브이"
        };
        //어댑터 객체 생성 (context, 안드로이드가 제공하는 옵션, 데이터(mid)) - 리스트 형식을 옵션 선택
        ArrayAdapter <String> adapter = new ArrayAdapter<>(this, android.R.layout.simple_list_item_1, mid); //리스트 형식
        list.setChoiceMode(ListView.CHOICE_MODE_MULTIPLE);
        ArrayAdapter <String> adapterMultiChoice = new ArrayAdapter<>(this, android.R.layout.simple_list_item_multiple_choice, mid); //체크박스 형식 - 멀티선택
        list.setChoiceMode(ListView.CHOICE_MODE_SINGLE);
        ArrayAdapter <String> adapterSingleChoice = new ArrayAdapter<>(this, android.R.layout.simple_list_item_single_choice, mid); //라디오 형식 - 싱글선택
        list.setAdapter(adapter);
        list.setOnItemClickListener(new AdapterView.OnItemClickListener() {
            @Override
            public void onItemClick(AdapterView<?> parent, View view, int position, long id) {
                Toast.makeText(getApplicationContext(),"position: " + Integer.toString(position)+", id: "+id, Toast.LENGTH_SHORT).show();
                Toast.makeText(MainActivity.this, mid[position], Toast.LENGTH_SHORT).show();
            }
        });
    }

}
3. 어댑터 뷰 - 리스트 뷰(레이아웃)
View2_AdapterView_ListView2_InLayout 프로젝트 만들기
res/drawable 폴더에 사진파일 저장.
(mov31.jpg, mov32.jpg, mov33.jpg, mov34.jpg, mov35.jpg,
mov36.jpg, mov37.jpg, mov38.jpg, mov39.jpg, mov40.jpg)
- activity_main.xml
<?xml version="1.0" encoding="utf-8"?>
<LinearLayout xmlns:android="http://schemas.android.com/apk/res/android"
    android:layout_width="match_parent"
    android:layout_height="match_parent"
    android:orientation="vertical">

    <ListView
        android:id="@+id/movieListView"
        android:layout_width="wrap_content"
        android:layout_height="wrap_content"/>

</LinearLayout>
- listitem.xml
<?xml version="1.0" encoding="utf-8"?>
<RelativeLayout xmlns:android="http://schemas.android.com/apk/res/android"
    android:layout_width="match_parent"
    android:layout_height="wrap_content"
    android:background="#eeeeee">

    <!--이미지-->
    <ImageView
        android:id="@+id/image"
        android:layout_width="80dp"
        android:layout_height="80dp"
        android:layout_alignParentLeft="true"
        android:layout_marginRight="8dp"/>

    <!--영화제목-->
    <TextView
        android:id="@+id/title"
        android:layout_width="wrap_content"
        android:layout_height="wrap_content"
        android:layout_alignTop="@+id/image"
        android:layout_toRightOf="@+id/image"
        android:textSize="17sp"
        android:textStyle="bold"/>

    <!--평점-->
    <TextView
        android:id="@+id/rating"
        android:layout_width="match_parent"
        android:layout_height="wrap_content"
        android:layout_below="@+id/title"
        android:layout_marginTop="1dip"
        android:layout_toRightOf="@+id/image"
        android:textSize="15sp"/>

    <!--장르-->
    <TextView
        android:id="@+id/genre"
        android:layout_width="match_parent"
        android:layout_height="wrap_content"
        android:layout_below="@+id/rating"
        android:layout_marginTop="5dp"
        android:layout_toRightOf="@+id/image"
        android:textColor="#666666"
        android:textSize="13sp"/>

    <!--제작년도-->
    <TextView
        android:id="@+id/releaseYear"
        android:layout_width="wrap_content"
        android:layout_height="wrap_content"
        android:layout_alignParentBottom="true"
        android:layout_alignParentRight="true"
        android:textColor="#888888"
        android:textSize="12sp"/>

</RelativeLayout>
- MainActivity.java
package com.example.view2_adapterview_listview2_inlayout;

import androidx.appcompat.app.AppCompatActivity;
import android.app.Activity;
import android.os.Bundle;
import android.view.LayoutInflater;
import android.view.View;
import android.view.ViewGroup;
import android.widget.AdapterView;
import android.widget.ArrayAdapter;
import android.widget.ImageView;
import android.widget.ListView;
import android.widget.TextView;
import android.widget.Toast;

public class MainActivity extends AppCompatActivity {

    ListView list;
    String [] titles = {
        "The Wizard of Oz(1939)",
        "Citzen Kane (1941)",
        "All About Eve (1950)",
        "The Third Man (1949)",
        "A Hard Day's Night (1964)",
        "The Wizard of Oz(1939)",
        "Citzen Kane (1941)",
        "All About Eve (1950)",
        "The Third Man (1949)",
        "A Hard Day's Night (1964)"
    };
    Integer[] images = {
        R.drawable.mov31,
        R.drawable.mov32,
        R.drawable.mov33,
        R.drawable.mov34,
        R.drawable.mov35,
        R.drawable.mov36,
        R.drawable.mov37,
        R.drawable.mov39,
        R.drawable.mov40
    };

    @Override
    protected void onCreate(Bundle savedInstanceState) {
        super.onCreate(savedInstanceState);
        setContentView(R.layout.activity_main);

        list = (ListView)findViewById(R.id.movieListView);
        //1. 어댑터 생성 - CustomListAdapter
        CustomListAdapter adapter = new CustomListAdapter(MainActivity.this);
        //2. 어댑터를 뷰에 설정
        list.setAdapter(adapter);
        //3. 리스너 구현
        list.setOnItemClickListener(new AdapterView.OnItemClickListener() {
            @Override
            public void onItemClick(AdapterView<?> adapterView, View view, int position, long l) {
                Toast.makeText(getApplicationContext(),titles[position],Toast.LENGTH_SHORT).show(); //getBaseContext() 동일
            }
        });
    }

    /**
     * Adapter 구현
     */
    public class CustomListAdapter extends ArrayAdapter<String> {//배열에서 가져옴

        private final Activity context;

        CustomListAdapter(Activity context){
            super(context, R.layout.listitem, titles);
            this.context = context;
        }

        /**
         * getView() 메서드 재구현(오버라이드)
         * @param position
         * @param convertView
         * @param parent
         * @return
         */
        @Override
        public View getView(int position, View convertView, ViewGroup parent) {
            //1. xml을 View 객체로 만들기 위해 inflater 객체 사용
            LayoutInflater inflater = context.getLayoutInflater();
            View rowView = inflater.inflate(R.layout.listitem, null ,false);

            //2. rowView(listitem.xml) 속에 있는 뷰(위젯)을 가져온다 - 내부클래스처럼 접근
            ImageView imageView = (ImageView)rowView.findViewById(R.id.image);
            TextView title = (TextView) rowView.findViewById(R.id.title);
            TextView rating= (TextView) rowView.findViewById(R.id.rating);
            TextView genre = (TextView) rowView.findViewById(R.id.genre);
            TextView year  = (TextView) rowView.findViewById(R.id.releaseYear);

            //3. 데이터 설정
            title.setText(titles[position]);
            imageView.setImageResource(images[position]);
            rating.setText("9.0" + position);
            genre.setText("DRAMA");
            year.setText(1930 + position + "");
            return rowView;
        }

    }

}
4. 리사이클러 뷰
View3_RecyclerView1 프로젝트 만들기
어댑터 뷰보다 권장한다.
androidx쪽으로 추가되는 것들 있다.
* 리사이클러 뷰
1) 최근에 권장되는 뷰이다.
2) AdapterView의 ListView와 매우 유사하다.
3) ListView와 차이점
-> ListView : 스크롤이 되어서 화면에서 벗어난 뷰는 제거되지 않고 그대로 존재한다.
-> RecyclerView : 스크롤이 되어 화면에서 벗어난 뷰는 새 항목 추가로 재사용된다.
>>> 스마트 폰 응답성 개선, 전력 소모 개선
* 리사이클러 뷰 구현 메서드
1) onCreateViewHolder() : ViewHolder 생성
리사이클러 뷰는 ViewHolder를 만들때마다 이 메서드를 호출한다.
item.xml을 inflate시켜서 View로 만든다.
2) onBindViewHolder() : iewHolder에 데이터 설정
3) getItemCount() : 연결된 데이터 개수 반환
위 3개 추상메서드 꼭 오버라이드 해야 한다.
res/drawable 폴더에 사진파일 저장.
(friend.png)
- activity_main.xml
<?xml version="1.0" encoding="utf-8"?>
<LinearLayout
    xmlns:android="http://schemas.android.com/apk/res/android"
    android:layout_width="match_parent"
    android:layout_height="match_parent">

    <!--recyclerView 설정-->
    <androidx.recyclerview.widget.RecyclerView
        android:id="@+id/rview"
        android:layout_width="match_parent"
        android:layout_height="match_parent">
    </androidx.recyclerview.widget.RecyclerView>

</LinearLayout>
- MainActivity.java
package com.example.view3_recyclerview1;

import androidx.appcompat.app.AppCompatActivity;
import androidx.recyclerview.widget.GridLayoutManager;
import androidx.recyclerview.widget.RecyclerView;

import android.os.Bundle;
import android.util.Log;
import android.view.View;
import android.widget.Toast;

public class MainActivity extends AppCompatActivity implements MyRecyclerViewAdapter.ItemClickListener {

    MyRecyclerViewAdapter adapter;

    @Override
    protected void onCreate(Bundle savedInstanceState) {
        super.onCreate(savedInstanceState);
        setContentView(R.layout.activity_main);

        String[] data = new String[100];
        for(int i=1 ; i <= 100 ; i++) {
            data[i - 1] = "friend #" + i;
        }
        RecyclerView recyclerView = findViewById(R.id.rview);
        int columns = 3;
        recyclerView.setLayoutManager(new GridLayoutManager(this, columns));
        //리사이클러 뷰 어댑터 객체 생성
        adapter = new MyRecyclerViewAdapter(this, data);
        //리스너 설정
        adapter.setClickListener(this);
        //뷰에 리사이클러어댑터를 설정
        recyclerView.setAdapter(adapter);
    }

    /**
     * ItemClickListener 인터페이스 구현 메서드
     * @param view
     * @param position
     */
    @Override
    public void onItemClick(View view, int position) {
        //Log.i("TAG", "item: " + adapter.getItem(position) + "number: " + position);    }
        Toast.makeText(getApplicationContext(),"item: " + adapter.getItem(position)+"number: " + position, Toast.LENGTH_SHORT).show();
    }

}
- item.xml
<?xml version="1.0" encoding="utf-8"?>
<LinearLayout xmlns:android="http://schemas.android.com/apk/res/android"
    xmlns:app="http://schemas.android.com/apk/res-auto"
    android:layout_width="200dp"
    android:layout_height="50dp"
    android:orientation="horizontal"
    android:padding="5dp">

    <ImageView
        android:id="@+id/imageView"
        android:layout_width="50dp"
        android:layout_height="match_parent"
        android:src="@drawable/friend" />

    <TextView
        android:id="@+id/info_text"
        android:layout_width="80dp"
        android:layout_height="match_parent"
        android:background="#CDDC39"
        android:gravity="center" />

</LinearLayout>
- MyRecyclerViewAdapter.java
package com.example.view3_recyclerview1;

import android.content.Context;
import android.view.LayoutInflater;
import android.view.View;
import android.view.ViewGroup;
import android.widget.TextView;
import androidx.annotation.NonNull;
import androidx.recyclerview.widget.RecyclerView;

/**
 * 리사이클러 뷰 구현
 */
public class MyRecyclerViewAdapter extends RecyclerView.Adapter<MyRecyclerViewAdapter.ViewHolder> {

    private String[] mData;
    private LayoutInflater mInflater;
    private ItemClickListener mClickListener;

    MyRecyclerViewAdapter(Context context, String[] data) {
        this.mInflater = LayoutInflater.from(context);
        this.mData = data;
    }

    //MyRecyclerViewAdapter의 추상메서드 3개를 구현해야 한다.

    /**
     * ViewHolder 생성
     * @param parent
     * @param viewType
     * @return
     */
    @Override
    public ViewHolder onCreateViewHolder(@NonNull ViewGroup parent, int viewType) {
        View view = mInflater.inflate(R.layout.item,  parent, false);
        return new ViewHolder(view);
    }

    /**
     * ViewHolder에 데이터 설정
     * @param holder
     * @param position
     */
    @Override
    public void onBindViewHolder(@NonNull ViewHolder holder, int position) {
        holder.myTextView.setText(mData[position]);
    }

    /**
     * 연결된 데이터 개수 반환
     * @return
     */
    @Override
    public int getItemCount() {
        return mData.length;
    }

//********************************************************************************************

    /**
     * ViewHolder 클래스 구현
     */
    public class ViewHolder extends RecyclerView.ViewHolder implements View.OnClickListener {

        TextView myTextView;

        ViewHolder(View itemView) {
            super(itemView);
            myTextView = itemView.findViewById(R.id.info_text);
            itemView.setOnClickListener(this);
        }

        /**
         * 리스너
         * @param view
         */
        @Override
        public void onClick(View view) {
            if (mClickListener != null) {
                mClickListener.onItemClick(view, getAdapterPosition());
            }
        }

    }

    String getItem(int id) {
        return mData[id];
    }

    void setClickListener(ItemClickListener itemClickListener) {
        this.mClickListener = itemClickListener;
    }

    /**
     * 아이템 클릭 인터페이스
     */
    public interface ItemClickListener {
        void onItemClick(View view, int position);
    }

}
5. ViewPager - 화면 옆으로 넘기기
View4_ViewPager1 프로젝트 만들기
뷰 페이저(ViewPager) : 손가락으로 화면을 왼쪽, 오른쪽으로 밀어서(스와이프) 다른 페이지로 이동하는 기능
res/drawable 폴더에 사진파일 저장.
(pic2.png, pic3.png, pic4.png, pic5.png)
- activity_main.xml
<?xml version="1.0" encoding="utf-8"?>
<LinearLayout
    xmlns:android="http://schemas.android.com/apk/res/android"
    android:layout_width="match_parent"
    android:layout_height="match_parent"
    android:orientation="vertical"
    android:background="@color/black" >

    <!--ViewPager 뷰 설정-->
    <androidx.viewpager.widget.ViewPager
        android:id="@+id/viewPager"
        android:layout_width="match_parent"
        android:layout_height="match_parent"/>

</LinearLayout>
- MainActivity.java
package com.example.view4_viewpager1;

import androidx.appcompat.app.AppCompatActivity;
import androidx.viewpager.widget.PagerAdapter;
import androidx.viewpager.widget.ViewPager;
import android.os.Bundle;
import android.widget.LinearLayout;

public class MainActivity extends AppCompatActivity {

    ViewPager viewPager;

    int[] images = {R.drawable.pic4, R.drawable.pic2, R.drawable.pic3,R.drawable.pic5};
    MyPagerAdapter myPagerAdapter;

    @Override
    protected void onCreate(Bundle savedInstanceState) {
        super.onCreate(savedInstanceState);
        setContentView(R.layout.activity_main);

        //1. ViewPager 위젯을 가져온다
        viewPager = (ViewPager)findViewById(R.id.viewPager);

        //2. 만들어 놓은  MyPagerAdapter 객체를 생성한다.
        myPagerAdapter = new MyPagerAdapter(MainActivity.this, images);

        //3. VewPAger에 Adapter를 붙인다.
        viewPager.setAdapter(myPagerAdapter);
    }

}
- item.xml
<?xml version="1.0" encoding="utf-8"?>
<LinearLayout
    xmlns:android="http://schemas.android.com/apk/res/android"
    android:layout_width="match_parent"
    android:layout_height="match_parent">

    <ImageView
        android:id="@+id/imageView"
        android:layout_width="match_parent"
        android:layout_height="match_parent"/>

</LinearLayout>
- MyPagerAdapter.java
package com.example.view4_viewpager1;

import android.content.Context;
import android.view.LayoutInflater;
import android.view.View;
import android.view.ViewGroup;
import android.widget.ImageView;
import android.widget.LinearLayout;

import androidx.annotation.NonNull;
import androidx.viewpager.widget.PagerAdapter;
import java.util.Objects;

public class MyPagerAdapter extends PagerAdapter {

    Context context;
    int[] images;

    LayoutInflater layoutInflater;

    public MyPagerAdapter(Context context, int[] images) {
        this.context = context;
        this.images = images;
        layoutInflater = (LayoutInflater) context.getSystemService(Context.LAYOUT_INFLATER_SERVICE );
    }

    /**
     * 개수
     * @return images.length
     */
    @Override
    public int getCount() {
        return images.length;
    }

    @Override
    public boolean isViewFromObject(@NonNull View view, @NonNull Object object) {
        return view == ((LinearLayout) object);
    }

    /**
     * 뷰 만들어서 return
     * @param container
     * @param position
     * @return itemView
     */
    @Override
    public Object instantiateItem( ViewGroup container, final int position) {
        //1. item.xml을 View로 객체화한다.
        View itemView = layoutInflater.inflate(R.layout.item,  container, false);
        //2. item.xml에 있는 ImageView를 가져온다. - activity_main.xml속의 itemView이므로 itemView.findViewById()로 처리
        ImageView imageView = (ImageView) itemView.findViewById(R.id.imageView);
        //3. 배열의 이미지 id를  이미지뷰에 설정한다.
        imageView.setImageResource(images[position]);
        //4. 컨테이너(뷰그룹)에 뷰를 추가한다.
        //   container는 null이 되면 안된다는 메소드이다.
        Objects.requireNonNull(container).addView(itemView);
        //5. 만들어진 itemView를 반환한다.
        return itemView;
    }

    /**
     * item이 사라지면 삭제한다.
     * @param container
     * @param position
     * @param object
     */
    @Override
    public void destroyItem(ViewGroup container, int position, Object object) {
        container.removeView((LinearLayout) object);
    }

}
6. 액티비티와 인텐트
Activity1_LifeCycle 프로젝트 만들기
안드로이드 앱은 실행단위는 액티비티 단위이다.
@ Activity
1) 앱은 Activity + Activity + Activity들이 모여서 구성된다. (확장자 : .apk)
2) 안드로이드 홈 화면에는 application launcher를 가지고 있다.
3) 각각의 앱은 AndroidManifest.xml에 intent-filter에 시작화면임을 설정해 놓았다.
@ 실행
1) 각각의 액티비티의 사용자 인터페이스가 그려지는 윈도우를 가지고 있다.
2) 안드로이드 실행단위는 앱 단위가 아니라 액티비티 단위로 실행된다.
3) 실행은 startActivity() 메서드를 호출해서 활성화시킨다. 이 때, 실행에 필요한 정보를 갖고 있는 메시지인 intent 객체를 넣어준다.
4) 안드로이드는 태스크(task), 액티비티 스택을 가지고 있다.
# 액티비티 스택 : 액티비티가 시작될 때마다 스택에 추가된다. 만약 back키를 누르면 스택에 저장된 이전에 액티비티가 활성화 되는 구조이다.
# 태스크 : 어떤 작업을 수행하기 위한 사용자가 상호작용하는 액티비티들을 모아놓은 그룹이다. 다른 애플리케이션의 액티비티도 동일한 태스크안에 유지시켜서 중간에 끊김없이 처리되도록 한다.
@ 인텐트(intent)
1) 하나의 액티비티에서 다른 액티비티를 시작하려면 여러정보를 담고 있는 메시지, 즉 인텐트가 필요하다.
2) 인텐트 메시징은 컴포넌트(하나의 액티비티, 즉 자바하나와 xml 하나)들을 실행시간에 바인딩하는 기법이다.
3) 액티비티들은 인텐트에 의해 활성화된다.
4) 종류
# 명시적(Explicit) 인텐트 : 주로 애플리케이션 내부에서 사용.
-> startActivity()
-> startResultActivity()
# 암시적(implicity) 인텐트 : 주로 애플리케이션 외부에서 사용. intent-filter에 필요한 내용을 action이나 category로 명시해 놓으면 안드로이드 시스템이 최적의 액티비티(컴포넌트)를 찾아서 onCreate() 메서드를 호출하고 인텐트를 넘겨서 액티비티를 활성화 시킨다.
@ 페이지간 이동시 넘어가는 필요한 요소
Activity A ---> 타깃 ActivityName ---> Activity B
Bundle(data)
Filter
액티비티가 통신하거나 활성화 할 때 intent 를 통해 한다.(기능이 추가된 request 느낌)
인텐트 보내는 메서드가 startActivity();
액티비티 호출시 명시적과 암시적이 있다.
명시적은 명확히 부르고, 이러한 기능할 줄 아는 것 나오라 할 때 action 즉, 암시적 호출.
- AndroidManifest.xml
<application
    android:allowBackup="true"
    android:icon="@mipmap/ic_launcher"
    android:label="@string/app_name"
    android:roundIcon="@mipmap/ic_launcher_round"
    android:supportsRtl="true"
    android:theme="@style/Theme.Activity1_LifeCycle">
    <activity
        android:name=".MainActivity"
        android:exported="true">
        <intent-filter>
            <action android:name="android.intent.action.MAIN" />
            <category android:name="android.intent.category.LAUNCHER" />
        </intent-filter>
    </activity>
    <activity android:name="">
        <intent-filter>
            <action></action>
            <category></category>
        </intent-filter>
    </activity>
    <activity android:name=""></activity>
</application>
- MainActivity.java
package com.example.activity1_lifecycle;

import androidx.appcompat.app.AppCompatActivity;

import android.os.Bundle;
import android.util.Log;
import android.view.KeyEvent;

public class MainActivity extends AppCompatActivity {

    @Override
    protected void onCreate(Bundle savedInstanceState) {
        Log.d("초기화","onCreat()호출");
        super.onCreate(savedInstanceState);
        setContentView(R.layout.activity_main);
    }

    @Override
    protected void onStart() {
        Log.d("시작","onStart()호출");
        super.onStart();
    }

    @Override
    protected void onResume() {
        Log.d("출력","onReSum()호출");
        super.onResume();
    }

    @Override
    protected void onPause() {
        Log.d("중지","onPause()호출");
        super.onPause();
    }

    @Override
    protected void onRestart() {
        Log.d("재실행","onReStart()호출");
        super.onRestart();
    }

    @Override
    protected void onStop() {
        Log.d("실행종료","onStop()호출");
        super.onStop();
    }

    @Override
    protected void onDestroy() {
        Log.d("끄기","onDestroy()호출");
        super.onDestroy();
    }

}
안드로이드 스튜디오에서 Logcat에 호출이라 적고 앱을 실행하면 호출에 대한 로그가 보인다.

7. 액티비티와 인텐트 : 명시적 인텐트
Activity2_ExplicitIntent_basic 프로젝트 만들기
res/drawable 폴더에 사진파일 저장.
(mov41.jpg, mov51.jpg)
- AndroidManifest.xml
<?xml version="1.0" encoding="utf-8"?>
<manifest xmlns:android="http://schemas.android.com/apk/res/android"
    package="com.example.activity2_explicitintent_basic">

    <application
        android:allowBackup="true"
        android:icon="@mipmap/ic_launcher"
        android:label="@string/app_name"
        android:roundIcon="@mipmap/ic_launcher_round"
        android:supportsRtl="true"
        android:theme="@style/Theme.Activity2_ExplicitIntent_basic">
        <activity
            android:name=".MainActivity"
            android:exported="true">
            <intent-filter>
                <action android:name="android.intent.action.MAIN" />
                <category android:name="android.intent.category.LAUNCHER" />
            </intent-filter>
        </activity>
        <activity android:name=".SecondActivity"/>
        <activity android:name=".ThirdActivity"/>
    </application>

</manifest>
- activity_main.java
<?xml version="1.0" encoding="utf-8"?>
<LinearLayout xmlns:android="http://schemas.android.com/apk/res/android"
    android:orientation="vertical"
    android:layout_width="match_parent"
    android:layout_height="match_parent"
    android:padding="10dp">

    <TextView
        android:layout_width="wrap_content"
        android:layout_height="wrap_content"
        android:text="Welcome Activity Change"
        android:layout_gravity="center_horizontal"
        android:textSize="22sp"
        android:layout_marginTop="20dp"
        android:textStyle="bold|italic"/>

    <LinearLayout
        android:layout_marginTop="100dp"
        android:layout_width="match_parent"
        android:layout_height="wrap_content"
        android:gravity="center_horizontal">
        <RadioGroup
            android:layout_width="match_parent"
            android:layout_height="wrap_content"
            android:orientation="horizontal"
            android:gravity="center">
            <RadioButton
                android:id="@+id/secondChk"
                android:layout_width="wrap_content"
                android:layout_height="wrap_content"
                android:text="Second액티비티"/>
            <RadioButton
                android:id="@+id/thirdChk"
                android:layout_width="wrap_content"
                android:layout_height="wrap_content"
                android:text="Third액티비티"/>
        </RadioGroup>
    </LinearLayout>

    <!--버튼에 이벤트메소드 등록-->
    <Button
        android:id="@+id/mBtn"
        android:layout_gravity="center_horizontal"
        android:layout_marginTop="50dp"
        android:layout_width="wrap_content"
        android:layout_height="wrap_content"
        android:background="#0bc4f7"
        android:text="새화면 열기"
        android:onClick="mOnClick"/>

</LinearLayout>
- MainActivity.java
package com.example.activity2_explicitintent_basic;

import android.content.Intent;
import android.os.Bundle;
import android.view.View;
import android.widget.Button;
import android.widget.RadioButton;
import androidx.appcompat.app.AppCompatActivity;

public class MainActivity extends AppCompatActivity {

    RadioButton secondChk,threeChk;
    Button mBtn;

    @Override
    protected void onCreate(Bundle savedInstanceState) {
        super.onCreate(savedInstanceState);
        setContentView(R.layout.activity_main);
        //체크박스
        secondChk = (RadioButton)findViewById(R.id.secondChk);
        threeChk  = (RadioButton)findViewById(R.id.thirdChk);
        //버튼
        mBtn      = (Button)findViewById(R.id.mBtn);
    }

    public void mOnClick(View v) {
        Intent intent = null;
        if(secondChk.isChecked() == true) {
            //1. 인텐트 객체 생성 - 이동할 Activity.class
            intent = new Intent(getApplicationContext(), SecondActivity.class);
            //2. 인텐트에 데이터 설정 putExtra(String key, value) - getIntExtra(key, 디폴트값), getStringExtra(key)
            intent.putExtra("name","홍길동");
            intent.putExtra("age", 30);
            //intent.setAction();
        }else if(threeChk.isChecked() == true) {
            intent = new Intent(getApplicationContext(), ThirdActivity.class);
        }
        //3. 이동처리
        startActivity(intent);
    }

}
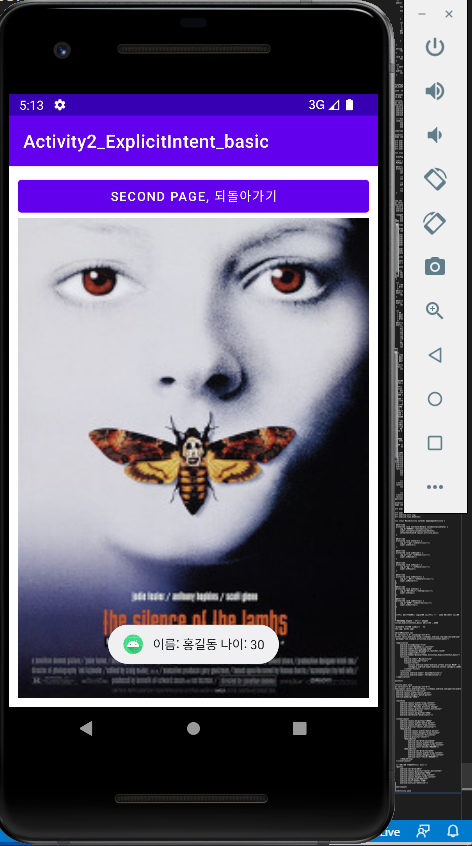
- activity_second.xml
<?xml version="1.0" encoding="utf-8"?>
<LinearLayout xmlns:android="http://schemas.android.com/apk/res/android"
    android:orientation="vertical"
    android:layout_width="match_parent"
    android:layout_height="match_parent"
    android:padding="10dp">
    <Button
        android:id="@+id/sBtn"
        android:layout_width="match_parent"
        android:layout_height="wrap_content"
        android:text="second page, 되돌아가기"
        android:onClick="sOnClick"/>
    <ImageView
        android:layout_width="match_parent"
        android:layout_height="match_parent"
        android:src="@drawable/mov41"
        android:scaleType="fitXY"/>
</LinearLayout>
- SecondActivity.java
package com.example.activity2_explicitintent_basic;

import android.content.Intent;
import android.os.Bundle;
import android.view.View;
import android.widget.Button;
import android.widget.Toast;

import androidx.appcompat.app.AppCompatActivity;

public class SecondActivity extends AppCompatActivity {

    Button sBtn;

    @Override
    protected void onCreate(Bundle savedInstanceState) {
        super.onCreate(savedInstanceState);
        setContentView(R.layout.activity_second);

        sBtn = (Button)findViewById(R.id.sBtn);
        //1. 인텐트를 받는다.
        Intent intent = getIntent();
        //2. 데이터를 꺼내온다 - get데이터타입Extra(key)
        String name = intent.getStringExtra("name");
        int age = intent.getIntExtra("age",0);
        Toast.makeText(getApplicationContext(), "이름: " + name + " 나이: " + Integer.toString(age), Toast.LENGTH_LONG).show();
    }

    //3. 돌아가기 - finish(): 현재 페이지를 스택에서 없애기 - 현재 액티비티 종료시킨다.
    public void sOnClick(View v){
        finish();
    }

}
- activity_third.xml
<?xml version="1.0" encoding="utf-8"?>
<LinearLayout xmlns:android="http://schemas.android.com/apk/res/android"
    android:orientation="vertical"
    android:layout_width="match_parent"
    android:layout_height="match_parent"
    android:padding="10dp">
    <Button
        android:id="@+id/tBtn"
        android:layout_width="match_parent"
        android:layout_height="wrap_content"
        android:text="third page, 되돌아가기"
        android:onClick="tOnClick"/>
    <ImageView
        android:layout_width="match_parent"
        android:layout_height="match_parent"
        android:src="@drawable/mov51"
        android:scaleType="fitXY"/>
</LinearLayout>
- ThirdActivity.java
package com.example.activity2_explicitintent_basic;

import android.os.Bundle;
import android.view.View;
import android.widget.Button;
import androidx.appcompat.app.AppCompatActivity;

public class ThirdActivity extends AppCompatActivity {

    Button tBtn;

    @Override
    protected void onCreate(Bundle savedInstanceState) {
        super.onCreate(savedInstanceState);
        setContentView(R.layout.activity_third);

        tBtn = (Button)findViewById(R.id.tBtn);
    }

    public void tOnClick(View v){
        finish();
    }

}
8. 액티비티와 인텐트 : 명시적 인텐트2 결과 받는 액티비티
Activity3_ExplicitInent_ReturnResult 프로젝트 만들기
데이터 넣기 putExtra()
데이터 꺼낼 때 get데이터타입Extra()
putExtra(String key, int value) ----------- int getIntExtra(String key, int default)
putExtra(String key, float value) --------- float getFloatExtra(String key, float default)
putExtra(String key, String value) -------- String getStringExtra(String key)
putExtra(String key, int[] value) -------- int[] getArrayExtra(String key)
- AndroidManifest.xml
<?xml version="1.0" encoding="utf-8"?>
<manifest xmlns:android="http://schemas.android.com/apk/res/android"
    package="com.example.activity3_explicitinent_returnresult">

    <application
        android:allowBackup="true"
        android:icon="@mipmap/ic_launcher"
        android:label="@string/app_name"
        android:roundIcon="@mipmap/ic_launcher_round"
        android:supportsRtl="true"
        android:theme="@style/Theme.Activity3_ExplicitInent_ReturnResult">
        <activity
            android:name=".MainActivity"
            android:exported="true">
            <intent-filter>
                <action android:name="android.intent.action.MAIN" />
                <category android:name="android.intent.category.LAUNCHER" />
            </intent-filter>
        </activity>
        <activity android:name=".Calculation"/>
    </application>

</manifest>
- activity_main.xml
<?xml version="1.0" encoding="utf-8"?>
<LinearLayout xmlns:android="http://schemas.android.com/apk/res/android"
    android:orientation="vertical"
    android:gravity="center"
    android:layout_margin="5dp"
    android:layout_width="match_parent"
    android:layout_height="match_parent">

    <TextView
        android:layout_width="wrap_content"
        android:layout_height="wrap_content"
        android:text="화면전환 데이터주고받기 연습1"
        android:textSize="20sp"
        android:textStyle="bold"/>

    <LinearLayout
        android:layout_marginTop="50dp"
        android:orientation="horizontal"
        android:gravity="center"
        android:layout_width="match_parent"
        android:layout_height="wrap_content">
        <TextView
            android:layout_width="100dp"
            android:layout_height="wrap_content"
            android:text="첫번째 값"/>
        <EditText
            android:id="@+id/ip1"
            android:layout_width="150dp"
            android:layout_height="wrap_content" />
    </LinearLayout>

    <LinearLayout
        android:orientation="horizontal"
        android:gravity="center"
        android:layout_width="match_parent"
        android:layout_height="wrap_content">
        <TextView
            android:layout_width="100dp"
            android:layout_height="wrap_content"
            android:text="두번째 값"/>

        <EditText
            android:id="@+id/ip2"
            android:layout_width="150dp"
            android:layout_height="wrap_content" />
    </LinearLayout>
    <LinearLayout
        android:layout_marginTop="10dp"
        android:gravity="center"
        android:layout_width="match_parent"
        android:layout_height="wrap_content">
        <Button
            android:id="@+id/plus"
            android:layout_width="75dp"
            android:layout_height="wrap_content"
            android:backgroundTint="#00BCD4"
            android:layout_marginRight="3dp"
            android:enabled="true"
            android:text="더하기"
            android:onClick="mCal"/>
        <Button
            android:id="@+id/sub"
            android:layout_width="75dp"
            android:layout_height="wrap_content"
            android:backgroundTint="#00BCD4"
            android:layout_marginRight="3dp"
            android:enabled="true"
            android:text="빼  기"
            android:onClick="mCal"/>
        <Button
            android:id="@+id/mul"
            android:layout_width="75dp"
            android:layout_height="wrap_content"
            android:backgroundTint="#00BCD4"
            android:layout_marginRight="3dp"
            android:enabled="true"
            android:text="곱하기"
            android:onClick="mCal"/>
        <Button
            android:id="@+id/div"
            android:layout_width="75dp"
            android:layout_height="wrap_content"
            android:backgroundTint="#00BCD4"
            android:enabled="true"
            android:text="나누기"
            android:onClick="mCal"/>
    </LinearLayout>

    <Button
        android:id="@+id/result"
        android:layout_width="wrap_content"
        android:layout_height="wrap_content"
        android:backgroundTint="#3F51B5"
        android:text="결과는?"/>

    <LinearLayout
        android:layout_marginTop="100dp"
        android:orientation="horizontal"
        android:gravity="center"
        android:layout_width="match_parent"
        android:layout_height="wrap_content">
        <TextView
            android:layout_width="80dp"
            android:layout_height="wrap_content"
            android:text="계산결과 값"/>
        <TextView
            android:id="@+id/output"
            android:layout_width="wrap_content"
            android:layout_height="wrap_content"/>
    </LinearLayout>

</LinearLayout>
- MainActivity.java
package com.example.activity3_explicitinent_returnresult;

import android.content.Intent;
import android.os.Bundle;
import android.view.View;
import android.widget.Button;
import android.widget.EditText;
import android.widget.TextView;

import androidx.appcompat.app.AppCompatActivity;

import java.text.DecimalFormat;

public class MainActivity extends AppCompatActivity {

    public static final int Request_Code_Menu = 100;

    EditText ip1,ip2;
    Button plus,sub,mul,div,result;
    TextView output;

    Intent intent ;
    int flag;

    @Override
    protected void onCreate(Bundle savedInstanceState) {
        super.onCreate(savedInstanceState);
        setContentView(R.layout.activity_main);

        ip1 = (EditText)findViewById(R.id.ip1);
        ip2 = (EditText)findViewById(R.id.ip2);
        plus = (Button)findViewById(R.id.plus);
        sub  = (Button)findViewById(R.id.sub);
        mul  = (Button)findViewById(R.id.mul);
        div  = (Button)findViewById(R.id.div);

        result = (Button)findViewById(R.id.result);
        output = (TextView) findViewById(R.id.output);

        //1. 인텐트 객체생성
        intent = new Intent(getApplicationContext(), Calculation.class);

        flag = 0;
        result.setOnClickListener(new View.OnClickListener() {
            @Override
            public void onClick(View view) {
                //2. 인텐트 전송
                startActivityForResult(intent, Request_Code_Menu);
            }
        });
    }

    public void mCal(View view) {
        if(view.getId() == R.id.plus) {
            intent.putExtra("cal", "plus");
            intent.putExtra("first", ip1.getText().toString());
            intent.putExtra("second",ip2.getText().toString());

            if(flag == 0) {
                plus.setEnabled(false);
                flag = 1;
            }else {
                plus.setEnabled(true);
                flag = 0;
            }

        }else if(view.getId() == R.id.sub) {
            intent.putExtra("cal", "sub");
            intent.putExtra("first", ip1.getText().toString());
            intent.putExtra("second",ip2.getText().toString());

            if(flag == 0) {
                sub.setEnabled(false);
                flag = 1;
            }else {
                sub.setEnabled(true);
                flag = 0;
            }

        }else if(view.getId() == R.id.mul){
            intent.putExtra("cal", "mul");
            intent.putExtra("first", ip1.getText().toString());
            intent.putExtra("second",ip2.getText().toString());

            if(flag == 0){
                mul.setEnabled(false);
                flag = 1;
            }else  {
                mul.setEnabled(true);
                flag = 0;
            }

        }else if(view.getId() == R.id.div)  {
            intent.putExtra("cal", "div");
            intent.putExtra("first", ip1.getText().toString());
            intent.putExtra("second",ip2.getText().toString());

            if(flag == 0){
                div.setEnabled(false);
                flag = 1;
            }else {
                div.setEnabled(true);
                flag = 0;
            }
        }

    }

    /**
     * 결과값 받기 - onActivityResult()
     * @param requestCode
     * @param resultCode
     * @param data
     */
    @Override
    protected void onActivityResult(int requestCode, int resultCode, Intent data) {
        super.onActivityResult(requestCode, resultCode, data);
        if(requestCode==Request_Code_Menu && resultCode == RESULT_OK) {
            double r = data.getDoubleExtra("결과값", 0);
            DecimalFormat form = new DecimalFormat("#.##");
            String result = form.format(r);
            output.setText(result);
            ip1.requestFocus();
        }
    }

}
- calculation.xml
<?xml version="1.0" encoding="utf-8"?>
<LinearLayout
    xmlns:android="http://schemas.android.com/apk/res/android"
    android:layout_width="match_parent"
    android:layout_height="match_parent"
    android:gravity="center_horizontal">

    <Button
        android:id="@+id/back"
        android:layout_width="wrap_content"
        android:layout_height="wrap_content"
        android:text="Main"/>

</LinearLayout>
- Calculation.java
package com.example.activity3_explicitinent_returnresult;

import android.app.Activity;
import android.content.Intent;
import android.os.Bundle;
import android.view.View;
import android.widget.Button;
import android.widget.Toast;

public class Calculation extends Activity {

    String cal, first, second ;
    double result;
    Button btn;

    @Override
    protected void onCreate(Bundle savedInstanceState) {
        super.onCreate(savedInstanceState);
        setContentView(R.layout.calculation);

        btn = (Button)findViewById(R.id.back);

        //1. 인텐트를 받아온다.
        Intent intent = getIntent();

        cal = intent.getStringExtra("cal").toString();
        first = intent.getStringExtra("first").toString();
        second= intent.getStringExtra("second").toString();

        Toast.makeText(getApplicationContext(),"첫번째 수 " + first + "와 두번째 수 " + second + "를" + cal + "하시오.", Toast.LENGTH_LONG).show();

        btn.setOnClickListener(new View.OnClickListener(){

            Intent intentB = new Intent(getApplicationContext(), MainActivity.class);
            @Override
            public void onClick(View view) {
                if ( cal.equals("plus")) {
                    result = Double.parseDouble(first)+ Double.parseDouble(second);
                    intentB.putExtra("결과값", result);
                }else if(cal.equals("sub")) {
                    result = Double.parseDouble(first) - Double.parseDouble(second);
                    intentB.putExtra("결과값", result);
                }else if(cal.equals("mul")) {
                    result = Double.parseDouble(first) * Double.parseDouble(second);
                    intentB.putExtra("결과값", result);
                }else if(cal.equals("div")) {
                    result = Double.parseDouble(first) / Double.parseDouble(second);
                    intentB.putExtra("결과값", result);
                }
                //결과값 설정
                setResult(RESULT_OK, intentB);
                //현재 페이지 종료
                finish();
            }
        });
    }

}
9. 액티비티와 인텐트 : 암시적 인텐트
Activity4_ImplicitIntent 프로젝트 만들기
@ Action 종류
1. Intent new Intent (액션, 데이터)
. 액션(action) – 수행되어야 하는 작업, String타입의 상수로 정의되어 있다. . 데이터
- ACTION_VIEW : 데이터를 사용자에게 표시한다. content://contacts/people/1 - 1번 연락처 표시
- ACTION_EDIT : 사용자가 편집할 수 있는 데이터를 표시한다. content://contacts/people/1 - 1번 연락처 편집
- ACTION_MAIN: 태스크의 초기 액티비티로 설정한다.
- ACTION_CALL : 전화통화를 시작한다. content://contacts/people/1 - 1번 연락처 전화통화
- ACTION_SUNC: 모바일 장치의 데이터를 서버상의 데이터와 일치시킨다.
- ACTION_DIAL : 전화번호를 누르는 화면을 표시한다. content://contacts/people/1 - 1번 연락처 전화걸기 화면표시
- ACTION_WEB_SEARCH: 웹검색창을 띄운다.
- 카테고리
. CATEGORY_BROWSABLE : 타깃 액티비티가 브라우저에 의해 시작되어서 이미지와 같은 데이터를 표시할수있다.
. CATEGORY_GADGET : 액티비티가 다른 액티비트 안에 게짓으로 내장된다.
. CATEGORY_HOME : 홈 화면을 표시하는 액티비티이다.
. CATEGORY_LANUNCHER: 액티비티가 최상위 애플리케이션으로 론터에 나열된다.
. CATEGORY_PREFERENCE: 타깃 액티비티가 환경설정 패널이다.
2. startActivity(intent)
3. ManfestActivity에 권한 설정
@ 인텐트 필터
. 컴포넌트 자신들이 처리할 수 있는 인텐트의 종류를 등재해 놓는다.
. 등재해놓고 안드로이드 시스템에 알리기 위함이다.
. 하나이상의 인텐트 필터를 가질수 있다.
. 컴포넌트가 수신할 수 있는 인테트의 집합을 기술한다.
. 암시적 인텐트에 국한된다.
. 액션과 카테고리로 등록할 수 있다.
- AndroidManifest.xml
<?xml version="1.0" encoding="utf-8"?>
<manifest xmlns:android="http://schemas.android.com/apk/res/android"
    package="com.example.activity4_implicitintent">

    <!--권한부여-->
    <uses-permission android:name="android.permission.CALL_PHONE"/>
    <uses-permission android:name="android.permission.ACCESS_NETWORK_STATE"/>
    <uses-permission android:name="android.permission.ACCESS_COARSE_LOCATION"/>
    <uses-permission android:name="android.permission.SEND_SMS"/>
    <uses-permission android:name="android.permission.CAMERA"/>
    <uses-permission android:name="android.permission.WRITE_EXTERNAL_STORAGE"/>

    <application
        android:allowBackup="true"
        android:icon="@mipmap/ic_launcher"
        android:label="@string/app_name"
        android:roundIcon="@mipmap/ic_launcher_round"
        android:supportsRtl="true"
        android:theme="@style/Theme.Activity4_ImplicitIntent">
        <activity
            android:name=".MainActivity"
            android:exported="true">
            <intent-filter>
                <action android:name="android.intent.action.MAIN" />
                <category android:name="android.intent.category.LAUNCHER" />
            </intent-filter>
        </activity>
    </application>

</manifest>
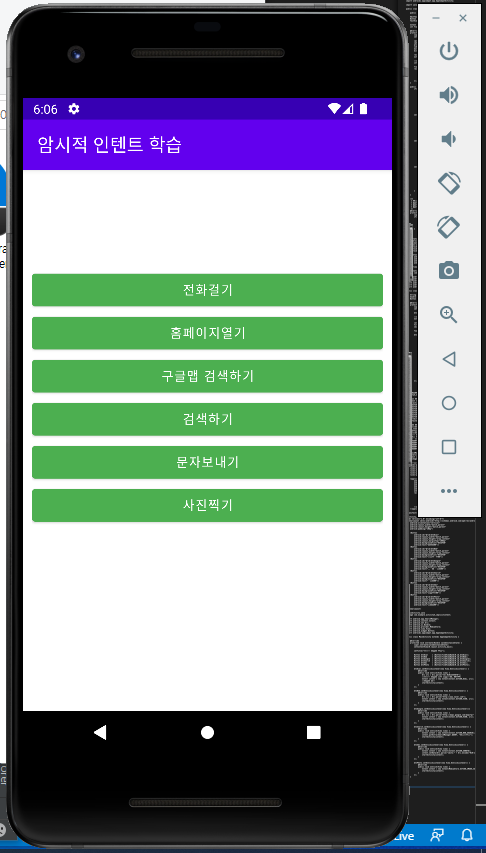
- activity_main.xml
<?xml version="1.0" encoding="utf-8"?>
<LinearLayout xmlns:android="http://schemas.android.com/apk/res/android"
    android:orientation="vertical"
    android:layout_width="match_parent"
    android:layout_height="match_parent"
    android:padding="10dp">

    <Button
        android:id="@+id/btnDial"
        android:layout_width="match_parent"
        android:layout_height="wrap_content"
        android:layout_marginTop="100dp"
        android:backgroundTint="#4CAF50"
        android:text="전화걸기"/>
    <Button
        android:id="@+id/btnWeb"
        android:layout_width="match_parent"
        android:layout_height="wrap_content"
        android:backgroundTint="#4CAF50"
        android:text="홈페이지열기"/>
    <Button
        android:id="@+id/btnGoogle"
        android:layout_width="match_parent"
        android:layout_height="wrap_content"
        android:backgroundTint="#4CAF50"
        android:text="구글맵 검색하기"/>
    <Button
        android:id="@+id/btnSearch"
        android:layout_width="match_parent"
        android:layout_height="wrap_content"
        android:backgroundTint="#4CAF50"
        android:text="검색하기"/>
    <Button
        android:id="@+id/btnSms"
        android:layout_width="match_parent"
        android:layout_height="wrap_content"
        android:backgroundTint="#4CAF50"
        android:text="문자보내기"/>
    <Button
        android:id="@+id/btnPhoto"
        android:layout_width="match_parent"
        android:layout_height="wrap_content"
        android:backgroundTint="#4CAF50"
        android:text="사진찍기"/>

</LinearLayout>
- MainActivity.java
package com.example.activity4_implicitintent;

import android.app.SearchManager;
import android.content.Intent;
import android.net.Uri;
import android.os.Bundle;
import android.provider.MediaStore;
import android.view.View;
import android.widget.Button;
import androidx.appcompat.app.AppCompatActivity;

public class MainActivity extends AppCompatActivity {

    @Override
    protected void onCreate(Bundle savedInstanceState) {
        super.onCreate(savedInstanceState);
        setContentView(R.layout.activity_main);

        setTitle("암시적 인텐트 학습");

        Button btnDial    = (Button)findViewById(R.id.btnDial);
        Button btnWeb     = (Button)findViewById(R.id.btnWeb);
        Button btnGoogle  = (Button)findViewById(R.id.btnGoogle);
        Button btnSearch  = (Button)findViewById(R.id.btnSearch);
        Button btnSms     = (Button)findViewById(R.id.btnSms);
        Button btnPhoto   = (Button)findViewById(R.id.btnPhoto);

        btnDial.setOnClickListener(new View.OnClickListener() {
            @Override
            public void onClick(View view) {
                Uri uri = Uri.parse("tel:01012345678");
                //암시적 인텐트 객체 생성(액션, 데이터)
                Intent intent = new Intent(Intent.ACTION_DIAL, uri);
                //인텐트 전송
                startActivity(intent);
            }
        });

        btnWeb.setOnClickListener(new View.OnClickListener() {
            @Override
            public void onClick(View view) {
                Uri uri = Uri.parse("http://www.naver.com");
                Intent intent = new Intent(Intent.ACTION_VIEW, uri);
                startActivity(intent);
            }
        });

        btnGoogle.setOnClickListener(new View.OnClickListener(){
            @Override
            public void onClick(View view) {
                Uri uri = Uri.parse("http://maps.google.com/maps?q=" + 37.554264 + "," + 126.913598);
                Intent intent = new Intent(Intent.ACTION_VIEW, uri);
                startActivity(intent);
            }
        });

        btnSearch.setOnClickListener(new View.OnClickListener() {
            @Override
            public void onClick(View view) {
                Intent intent = new Intent(Intent.ACTION_WEB_SEARCH);
                intent.putExtra(SearchManager.QUERY, "안드로이드");
                startActivity(intent);
            }
        });

        btnSms.setOnClickListener(new View.OnClickListener() {
            @Override
            public void onClick(View view) {
                Intent intent = new Intent(Intent.ACTION_SENDTO);
                intent.setData(Uri.parse("smsto:" + Uri.encode("010-1234-4567")));
                startActivity(intent);
            }
        });

        btnPhoto.setOnClickListener(new View.OnClickListener() {
            @Override
            public void onClick(View view) {
                Intent intent = new Intent(MediaStore.ACTION_IMAGE_CAPTURE);
                startActivity(intent);
            }
        });
    }

}
10. 데이터 저장과 관리
- CMD
sqlite3
'sqlite3'은(는) 내부 또는 외부 명령, 실행할 수 있는 프로그램, 또는
배치 파일이 아닙니다.
안나온다.
C:\Users\tj\AppData\Local\Android\Sdk : Sdk 경로
C:\Users\tj\AppData\Local\Android\Sdk\platform-tools : 주소복사 (sqlite3.exe 파일 존재)
설정 - 시스템 - 정보 - 고급 시스템 설정 - 고급 - 환경 변수 - 시스템 변수 - Path - 편집 - 새로 만들기 하여 복사한 주소 붙여넣기.
확인 누른 후 다시 CMD창 열기
DB 저장할 폴더 만들기
C:\SQLiteDB
- CMD
C:\Users\tj>sqlite3
SQLite version 3.32.2 2021-07-12 15:00:17
Enter ".help" for usage hints.
Connected to a transient in-memory database.
Use ".open FILENAME" to reopen on a persistent database.
sqlite> .exit

C:\Users\tj>sqlite3 C:\SQLiteDB\member.db
SQLite version 3.32.2 2021-07-12 15:00:17
Enter ".help" for usage hints.
sqlite> .table
sqlite>
member.db 파일이 만들어진다.
.exit : 종료
.table : 테이블 조회
- CMD
C:\Users\tj>sqlite3 member.db
SQLite version 3.32.2 2021-07-12 15:00:17
Enter ".help" for usage hints.
sqlite> CREATE TABLE PEOPLE(
   ...> _ID INTEGER PRIMARY KEY AUTOINCREMENT,
   ...> NAME TEXT,
   ...> AGE TEXT);
sqlite> .table
PEOPLE
테이블 생성했다.
- CMD
C:\Users\tj>sqlite3 member.db
sqlite> DROP TABLE PEOPLE;
테이블 삭제했다.
Database1_CRUD 프로젝트 만들기
@SQLite
1) .table : 테이블 조회
2) .exit : 종료
3) .schema 테이블 이름 : 테이블의 열, 데이터 형식 등을 보여준다.
@ 구현
1) SQLiteOpenHelper 클래스를 정의한다.
-> 데이터베이스 생성
-> 데이터베이스 버전관리를 도와주는 클래스이다.
2) SQLiteOpenHelper 객체 생성
3) 데이터베이스 쓰기/읽기 DB객체를 가져온다.
-> getWriterableDatabase() - 쓰기 -> SQLiteDatabase 객체 리턴
-> getReadableDatabase() - 읽기 -> SQLiteDatabase 객체 리턴
4) SQLiteDatabase(db)의
-> insert() : 삽입
-> query() : 검색
-> update() : 수정
-> delete() : 삭제
5) db.close() : 종료처리
- activity_main.xml
<?xml version="1.0" encoding="utf-8"?>
<LinearLayout xmlns:android="http://schemas.android.com/apk/res/android"
    android:layout_width="match_parent"
    android:layout_height="match_parent"
    android:orientation="vertical"
    android:padding="10dp">

    <EditText
        android:id="@+id/editeName"
        android:layout_width="match_parent"
        android:layout_height="wrap_content"
        android:layout_marginTop="50dp"
        android:hint="이름입력"
        android:selectAllOnFocus="true"/>

    <EditText
        android:id="@+id/editeAge"
        android:layout_width="match_parent"
        android:layout_height="wrap_content"
        android:hint="나이입력"
        android:inputType="number"
        android:selectAllOnFocus="true"/>

    <TableLayout
        android:layout_marginTop="100dp"
        android:layout_width="match_parent"
        android:layout_height="wrap_content">
        <TableRow
            android:layout_width="match_parent"
            android:layout_height="wrap_content"
            android:gravity="center_horizontal">
            <Button
                android:id="@+id/btnInsert"
                android:layout_width="wrap_content"
                android:layout_height="wrap_content"
                android:backgroundTint="#FF9800"
                android:layout_marginRight="5dp"
                android:onClick="mOnClick"
                android:text="삽 입"/>
            <Button
                android:id="@+id/btnSelectAll"
                android:layout_width="wrap_content"
                android:layout_height="wrap_content"
                android:backgroundTint="#E498E0E9"
                android:layout_marginRight="5dp"
                android:onClick="mOnClick"
                android:text="전체검색"/>
            <Button
                android:id="@+id/btnSelectName"
                android:layout_width="wrap_content"
                android:layout_height="wrap_content"
                android:backgroundTint="#E498E0E9"
                android:onClick="mOnClick"
                android:text="이름검색"/>
        </TableRow>
        <TableRow
            android:layout_width="match_parent"
            android:layout_height="match_parent"
            android:gravity="center_horizontal">
            <Button
                android:id="@+id/btnUpdateAge"
                android:layout_width="wrap_content"
                android:layout_height="wrap_content"
                android:backgroundTint="#FF9800"
                android:layout_marginRight="5dp"
                android:onClick="mOnClick"
                android:text="나이갱신"/>
            <Button
                android:id="@+id/btnDeleteName"
                android:layout_width="wrap_content"
                android:layout_height="wrap_content"
                android:backgroundTint="#FF9800"
                android:layout_marginRight="5dp"
                android:onClick="mOnClick"
                android:text="이름삭제"/>
            <Button
                android:id="@+id/btnDeleteAll"
                android:layout_width="wrap_content"
                android:layout_height="wrap_content"
                android:backgroundTint="#FF9800"
                android:onClick="mOnClick"
                android:text="전체삭제"/>
        </TableRow>
    </TableLayout>

    <ScrollView
        android:layout_width="match_parent"
        android:layout_height="match_parent"
        android:layout_marginTop="20dp"
        android:fadeScrollbars="false"
        android:padding="4dp">
        <TextView
            android:id="@+id/textResult"
            android:layout_width="match_parent"
            android:layout_height = "wrap_content"
            android:gravity="center_horizontal"
            android:textSize="18dp"/>
    </ScrollView>

</LinearLayout>
- MainActivity.java
package com.example.database1_crud;

import androidx.appcompat.app.AppCompatActivity;

import android.content.ContentValues;
import android.content.Context;
import android.database.Cursor;
import android.database.sqlite.SQLiteDatabase;
import android.database.sqlite.SQLiteOpenHelper;
import android.os.Bundle;
import android.view.View;
import android.widget.EditText;
import android.widget.TextView;

class MyDBHelper extends SQLiteOpenHelper {// Ctrl+i 오버라이드 처리

    /**
     * mytest.db를 생성
     * @param context
     */
    MyDBHelper(Context context) {
        super(context, "mytest.db", null,1); //버전지정
        //나중에 테이블 구조가 변경되어 앱을 빌드/설치/실행하면 아래에 있는 onUpgrade() 메서드를 자동 호출
    }

    @Override
    public void onCreate(SQLiteDatabase sqLiteDatabase) {
        //테이블 생성
        sqLiteDatabase.execSQL("create table people (_id integer primary key autoincrement, name text, age text);");
    }

    @Override
    public void onUpgrade(SQLiteDatabase sqLiteDatabase, int i, int i1) {
        //테이블을 수정하기 위해서 기존의 테이블은 삭제
        sqLiteDatabase.execSQL("drop table if exists pepole;");
    }

}

//MainActivity
public class MainActivity extends AppCompatActivity {

    MyDBHelper myDBHelper;
    EditText mEditName;
    EditText mEditAge;
    TextView mTextResult;

    @Override
    protected void onCreate(Bundle savedInstanceState) {
        super.onCreate(savedInstanceState);
        setContentView(R.layout.activity_main);
        //DBHelper 객체 생성
        myDBHelper = new MyDBHelper(this);
        mEditName  = (EditText)findViewById(R.id.editeName);
        mEditAge   = (EditText)findViewById(R.id.editeAge);
        mTextResult= (TextView)findViewById(R.id.textResult);
    }

    public void mOnClick(View v) {
        SQLiteDatabase db;
        ContentValues values; //하나의 레코드를 정의하는 객체(레코드 생성). 레코드의 삽입과 갱신에 사용(쓰기시 사용).
        String [] projection = {"_id", "name", "age"};
        Cursor cur; //여러개의 레코드를 가져와서 객체화시키고 하나에 접근하여 필드값을 꺼낼 수 있다(읽기시 사용).
        switch(v.getId()) {

            case R.id.btnInsert:
                if(mEditName.getText().length() > 0 && mEditAge.getText().length() > 0) {
                    //쓰기 데이터베이스
                    db = myDBHelper.getWritableDatabase();
                    //쓰기위한 레코드를 생성
                    values = new ContentValues();
                    values.put("name", mEditName.getText().toString());
                    values.put("age", mEditAge.getText().toString());
                    //INSERT
                    db.insert("people", null, values);
                    //종료
                    db.close();
                }
                break;

            case R.id.btnSelectAll:
                //읽기 데이터베이스
                db = myDBHelper.getReadableDatabase();
                //읽어와서 Cursor 객체를 얻는다.
                cur = db.query("people", projection, null, null, null, null, null);
                if(cur != null) {
                    showResult(cur); //Cursor에 있는 검색 결과를 구현해 놓은 showResult() 메서드 호출해서 출력한다.
                    cur.close();
                }
                //닫기
                myDBHelper.close();
                break;

            case R.id.btnSelectName:
                if(mEditName.getText().length() > 0) {
                    db = myDBHelper.getReadableDatabase();
                    String name = mEditName.getText().toString();
                    cur = db.query("people", projection, "name=?", new String[]{name}, null, null, null);
                    if(cur != null) {
                        showResult((cur));
                        cur.close();
                    }
                    myDBHelper.close();
                }
                break;

            case R.id.btnUpdateAge:
                if(mEditName.getText().length() > 0 && mEditAge.getText().length() > 0) {
                    db = myDBHelper.getWritableDatabase();
                    String name = mEditName.getText().toString();
                    values = new ContentValues();
                    values.put("age",mEditAge.getText().toString());
                    db.update("people", values, "name=?", new String[]{name});
                    myDBHelper.close();
                }
                break;

            case R.id.btnDeleteName:
                if(mEditName.getText().length() > 0) {
                    db = myDBHelper.getWritableDatabase();
                    String name = mEditName.getText().toString();
                    db.delete("people", "name", new String[]{name});
                    myDBHelper.close();
                }
                break;

            case R.id.btnDeleteAll:
                db = myDBHelper.getWritableDatabase();
                db.delete("people", null, null);
                myDBHelper.close();
                break;

        }
    }

    void showResult(Cursor cur) {
        mTextResult.setText("");
        int name_col = cur.getColumnIndex("name");
        int age_col = cur.getColumnIndex("age");
        while (cur.moveToNext()) {
            String name = cur.getString(name_col);
            String age  = cur.getString(age_col);
            mTextResult.append(name+","+age+"\n");
        }
    }

}
'교육 정리 > 안드로이드 앱 제작(Java)' 카테고리의 다른 글
| 6일차. 데이터 저장과 관리2, 파일, 서비스, 브로드캐스트, 프로바이더, 맵 (2) | 2022.11.12 |
|---|---|
| 4일차. 그래픽과 이미지 (2) | 2022.10.29 |
| 3일차. 레이아웃 익히기2, 이벤트, 고급 위젯 다루기 (2) | 2022.10.22 |
| 2일차. 레이아웃 익히기, 고급위젯 다루기 (2) | 2022.10.08 |
| 1일차. 안드로이드의 개요와 개발환경 설치, 안드로이드 애플리케이션, Java 문법, 기본 위젯 익히기 (0) | 2022.10.01 |


댓글