버츄얼 디바이스 켜기
1. layout-gravity 속성과 gravity 속성
Ch1_App7 프로젝트 만들기
AndroidManifest.xml에 Activity를 추가했으나 지금은 프로젝트 생성시 저절로 만들어진다.
res/values/strings.xml에서 프로젝트명을 불러온다.
res/values/themes/themes.xml 에서 기기의 디자인 테마를 바꿀 수 있다.
- themes.xml
<resources xmlns:tools="http://schemas.android.com/tools">
    <!-- Base application theme. -->
    <style name="Theme.Ch1_App7" parent="Theme.MaterialComponents.DayNight.DarkActionBar">
        <!-- Primary brand color. -->
        <item name="colorPrimary">#00BCD4</item>
        <item name="colorPrimaryVariant">@color/teal_200</item>
        <item name="colorOnPrimary">@color/white</item>
        <!-- Secondary brand color. -->
        <item name="colorSecondary">@color/teal_200</item>
        <item name="colorSecondaryVariant">@color/teal_700</item>
        <item name="colorOnSecondary">@color/black</item>
        <!-- Status bar color. -->
        <item name="android:statusBarColor" tools:targetApi="l">?attr/colorPrimaryVariant</item>
        <!-- Customize your theme here. -->
    </style>
</resources>
※ 참고 : @+ 는 추가, @는 참조
- strings.xml
<resources>
    <string name="app_name">Ch1_App7</string>
    <string name="text">"안녕하세요!"</string>
</resources>
위에 <string name="text">를 추가한다.
- activity_main.xml
    <TextView
        android:layout_width="wrap_content"
        android:layout_height="wrap_content"
        android:text="@string/text"/>
속성 android:text="@string/text" 추가한다. 참조하는 것을 볼 수 있다.
LinearLayout 태그 안에 또 LinearLayout 태그를 넣을 수 있다. 즉 중첩으로 넣을 수 있다.
- activity_main.xml
<?xml version="1.0" encoding="utf-8"?>
<LinearLayout xmlns:android="http://schemas.android.com/apk/res/android"
    android:layout_width="match_parent"
    android:layout_height="match_parent">

    <TextView
        android:layout_width="wrap_content"
        android:layout_height="wrap_content"
        android:text="@string/text"/>
    <LinearLayout
        android:layout_width="wrap_content"
        android:layout_height="wrap_content"/>

</LinearLayout>
TextView 태그는 Button의 부모이다.
id 추가시에 android:id="abc"가 아닌 android:id="@+id/abc"로 넣어야 한다.
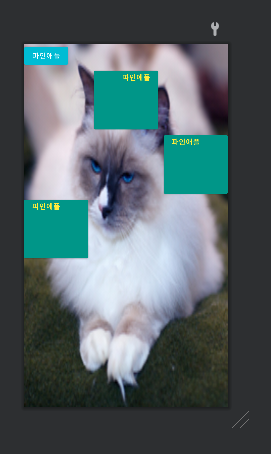
백그라운드 이미지 넣기 위해 먼저 res/drawable 경로에 이미지를 넣는다.
이후 activity_main.xml의 LinearLayout 태그에 android:background="@drawable/cat"로 불러온다.
activity_main.xml의 ScrollView 태그 안에 LinearLayout 태그를 추가하는 등 중첩으로 레이아웃 만들 수 있다.
LinearLayout 태그 안에 Button 태그에 android:text="@string/text"를 통해 strings.xml에 선언한 속성을 참조한다.
color.xml에서 <color name="textColor">#FFEB3B</color> 등록한다.
다시 Button 태그에서 android:textColor="@color/textColor"로 불러온다.
android:textStyle="normal|bold" 이런식으로 속성값을 여러개 넣을 수 있다.
gravity 속성은 자식의 내부 글자 위치를 잡고, layout-gravity는 부모 안에서 현재 태그가 어디에 위치할 것인가를 설정.
- strings.xml
<resources>
    <string name="app_name">Ch1_App7</string>
    <string name="text">파인애플</string>
</resources>
- color.xml
<?xml version="1.0" encoding="utf-8"?>
<resources>
    <color name="purple_200">#FFBB86FC</color>
    <color name="purple_500">#FF6200EE</color>
    <color name="purple_700">#FF3700B3</color>
    <color name="teal_200">#FF03DAC5</color>
    <color name="teal_700">#FF018786</color>
    <color name="black">#FF000000</color>
    <color name="white">#FFFFFFFF</color>

    <color name="textColor">#FFEB3B</color>
</resources>
- activity_main.xml
<?xml version="1.0" encoding="utf-8"?>
<LinearLayout xmlns:android="http://schemas.android.com/apk/res/android"
    android:layout_width="match_parent"
    android:layout_height="match_parent"
    android:orientation="vertical"
    android:background="@drawable/cat">

    <Button
        android:layout_width="wrap_content"
        android:layout_height="wrap_content"
        android:text="@string/text"/>

    <ScrollView
        android:layout_width="match_parent"
        android:layout_height="wrap_content">

        <LinearLayout
            android:layout_width="match_parent"
            android:layout_height="wrap_content"
            android:orientation="vertical">

            <Button
                android:layout_width="130dp"
                android:layout_height="130dp"
                android:backgroundTint="#009688"
                android:text="@string/text"
                android:textColor="@color/textColor"
                android:textStyle="normal|bold"

                android:gravity="right|top"
                android:layout_gravity="center"/>

        </LinearLayout>

    </ScrollView>

</LinearLayout>
결과 소스다.
res/layout/activity_main2.xml를 만들고 MainActivity.java에 onCreate()메서드에서 setContentView(R.layout.activity_main2); 이렇게 불러온다.
- activity_main2.xml
<?xml version="1.0" encoding="utf-8"?>
<LinearLayout xmlns:android="http://schemas.android.com/apk/res/android"
    android:layout_width="match_parent"
    android:layout_height="match_parent"
    android:orientation="vertical"
    android:background="@drawable/cat">

    <Button
        android:layout_width="wrap_content"
        android:layout_height="wrap_content"
        android:text="@string/text"/>

    <ScrollView
        android:layout_width="match_parent"
        android:layout_height="wrap_content">

        <LinearLayout
            android:layout_width="match_parent"
            android:layout_height="wrap_content"
            android:orientation="vertical">

            <Button
                android:layout_width="130dp"
                android:layout_height="130dp"
                android:backgroundTint="#009688"
                android:text="@string/text"
                android:textColor="@color/textColor"
                android:textStyle="normal|bold"

                android:gravity="right|top"
                android:layout_gravity="center"/>

            <Button
                android:layout_width="130dp"
                android:layout_height="130dp"
                android:backgroundTint="#009688"
                android:text="@string/text"
                android:textColor="@color/textColor"
                android:textStyle="normal|bold"

                android:gravity="left|top"
                android:layout_gravity="right"/>

            <Button
                android:layout_width="130dp"
                android:layout_height="130dp"
                android:backgroundTint="#009688"
                android:text="@string/text"
                android:textColor="@color/textColor"
                android:textStyle="normal|bold"

                android:gravity="left|top"
                android:layout_gravity="left"/>

        </LinearLayout>

    </ScrollView>

</LinearLayout>
- MainActivity.java
package com.example.ch1_app7;

import androidx.appcompat.app.AppCompatActivity;

import android.os.Bundle;

public class MainActivity extends AppCompatActivity {

    @Override
    protected void onCreate(Bundle savedInstanceState) {
        super.onCreate(savedInstanceState);
        setContentView(R.layout.activity_main2);
    }

}
중간에 오류가 나는 문제는 그래들 빌드시에 compileSdk 버전 오류다.
기존 31에서 32로 수정했다.
- build.gradle
android {
    compileSdk 32

    defaultConfig {
        applicationId "com.example.ch1_app8"
        minSdk 21
        targetSdk 32
        versionCode 1
        versionName "1.0"

        testInstrumentationRunner "androidx.test.runner.AndroidJUnitRunner"
    }
    ...
}
이렇게 수정했다.
이후 프로젝트와 Sync Now로 싱크 맞추기.
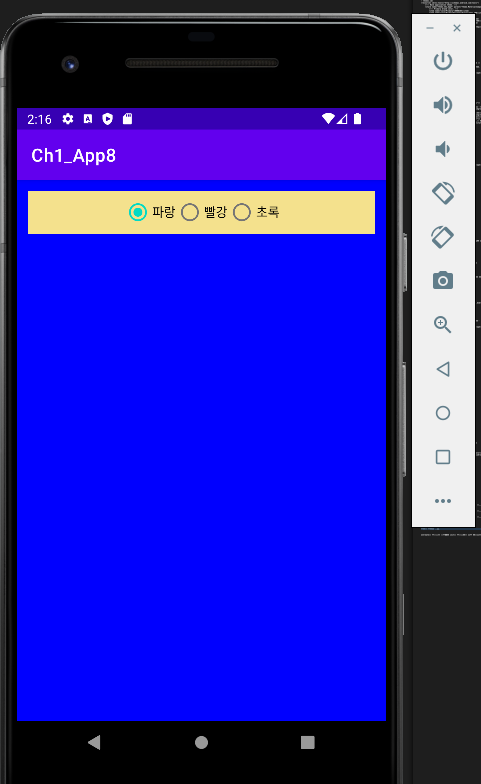
2. Radio 버튼
Ch1_App8 프로젝트 만들기
android:onClick="mOnClick" 이렇게 이벤트 메서드 이름 지정할 수 있다.
- activity_main.xml
<?xml version="1.0" encoding="utf-8"?>
<LinearLayout xmlns:android="http://schemas.android.com/apk/res/android"
    android:layout_width="match_parent"
    android:layout_height="match_parent"
    android:orientation="vertical"
    android:id="@+id/backColor"
    android:padding="12dp">

    <RadioGroup
        android:id="@+id/radioGroup"
        android:orientation="horizontal"
        android:gravity="center_horizontal"
        android:layout_width="match_parent"
        android:layout_height="wrap_content"
        android:background="#f4e18d">

        <RadioButton
            android:id="@+id/blue"
            android:layout_width="wrap_content"
            android:layout_height="wrap_content"
            android:text="파랑"
            android:onClick="mOnClick"/>

        <RadioButton
            android:id="@+id/red"
            android:layout_width="wrap_content"
            android:layout_height="wrap_content"
            android:text="빨강"
            android:onClick="mOnClick"/>

        <RadioButton
            android:id="@+id/green"
            android:layout_width="wrap_content"
            android:layout_height="wrap_content"
            android:text="초록"
            android:onClick="mOnClick"/>

    </RadioGroup>

</LinearLayout>
이렇게 화면을 구성했다.
- MainActivity.java
package com.example.ch1_app8;

import androidx.appcompat.app.AppCompatActivity;

import android.os.Bundle;
import android.view.View;
import android.widget.LinearLayout;
import android.widget.RadioButton;
import android.widget.RadioGroup;

public class MainActivity extends AppCompatActivity {

    //전역 변수 선언
    LinearLayout mLayout;
    RadioGroup mRadioGroup;

    @Override
    protected void onCreate(Bundle savedInstanceState) {
        super.onCreate(savedInstanceState);
        setContentView(R.layout.activity_main);

        //LinearLayout 태그 속성 객체로 가져오기
        mLayout = (LinearLayout)findViewById(R.id.backColor);
        mRadioGroup = (RadioGroup)findViewById(R.id.radioGroup);

        //Radio 초기값 설정
        int id = R.id.blue;
        mRadioGroup.check(id); //체크박스에 체크
        colorChange(id); //체크하고 난 뒤에 이벤트 실행
    }

    /**
     * 이벤트 메서드
     * (xml 위젯에서 호출)
     * @param view
     */
    public void mOnClick(View view) {
        RadioButton radioButton = (RadioButton)view;
        colorChange(radioButton.getId());
    }

    /**
     * 색깔 바꾸는 메서드
     * @param id
     */
    void colorChange(int id) {
        switch(id) {
            case R.id.red:
                mLayout.setBackgroundColor(0xffff0000); //투명도 + RGB 16진수
                break;
            case R.id.blue:
                mLayout.setBackgroundColor(0xff0000ff); //투명도 + RGB 16진수
                break;
            case R.id.green:
                mLayout.setBackgroundColor(0xff00ff00); //투명도 + RGB 16진수
                break;
        }
    }

}
이렇게 클래스 구성.
onCreate() 메서드는 서블릿의 init() 메서드처럼 앱이 실행되면 실행되는 메서드다.
3. ImageView (이미지 출력 위젯)
Ch1_App8ImageView 프로젝트 생성.
· 이미지 크기 지정 : maxWidth, maxHeight
· matrix : 종횡비는 유지하되 좌상단을 기준으로 확대해서 채운다.
· fixXy : 종횡비는 유지하되 종횡중에서 큰 쪽을 영역에 맞춘다.
· fixStart : 종횡비를 유지하지 않고 영역에 모두 채운다. (억지로 맞춰 일그러질 수 있음)
· fixCenter : 중앙을 기준으로 종횡비중 큰 쪽을 영역에 맞춘다.
· fixEnd : 우측 하단을 기준으로 종횡비중 큰 쪽을 영역에 맞춘다.
· center : 영역과 이미지 중앙을 기준으로 맞춘다.
· centerCrop : 이미지의 정중앙을 종횡비중 작은 쪽을 맞출때까지 확대해서 맞춘다.
· centerInSide : 이미지의 정중앙을 종횡비중 큰 쪽을 맞출때까지 확대해서 맞춘다.
* 자바코드
- setImageResource(R.drawble.picture)
- setMaxWidth()
- setScaleType()
res/drawable에 jeju11.png 넣기
ScrollView 태그에 LinearLayout 추가하고 또 이 태그 안에 HorizontalScrollView 태그 추가한다.
HorizontalScrollView 태그는 새로로 스크롤한다.
HorizontalScrollView 태그 안에 LinearLayout 태그 추가.
위처럼 레이아웃은 중첩으로 들어갈 수 있다.
LinearLayout 안에 TextView 태그
- activity_main.xml
<?xml version="1.0" encoding="utf-8"?>
<ScrollView xmlns:android="http://schemas.android.com/apk/res/android"
    android:layout_width="match_parent"
    android:layout_height="match_parent">

    <LinearLayout
        android:layout_width="match_parent"
        android:layout_height="match_parent"
        android:orientation="vertical">

        <HorizontalScrollView
            android:layout_width="match_parent"
            android:layout_height="match_parent">

            <LinearLayout
                android:layout_width="match_parent"
                android:layout_height="match_parent"
                android:orientation="vertical"
                android:background="#BFC3C3">

                <TextView
                    android:layout_width="match_parent"
                    android:layout_height="wrap_content"
                    android:layout_marginTop="10dp"
                    android:text="matrix"/>

                <ImageView
                    android:layout_width="match_parent"
                    android:layout_height="wrap_content"
                    android:background="#F7ED92"
                    android:src="@drawable/jeju11"
                    android:scaleType="matrix"/>

                <TextView
                    android:layout_width="match_parent"
                    android:layout_height="wrap_content"
                    android:layout_marginTop="10dp"
                    android:text="fitXY"/>

                <ImageView
                    android:layout_width="match_parent"
                    android:layout_height="wrap_content"
                    android:background="#F7ED92"
                    android:src="@drawable/oreo"
                    android:scaleType="fitXY"/>

                <!-- 나머지는 속성을 넣어서 비교 -->

            </LinearLayout>

        </HorizontalScrollView>

    </LinearLayout>

</ScrollView>

4. ImageButton
Ch1_App9ImageButton 프로잭트 만들기
res/drawable에 mov05.jpg, mov24.jpg, strawberry.png, watermelon.png 사진 넣기
LinearLayout 태그 안에 ImageButton 태그, ImageView 태그 추가.
- activity_main.xml
<?xml version="1.0" encoding="utf-8"?>
<LinearLayout xmlns:android="http://schemas.android.com/apk/res/android"
    android:layout_width="match_parent"
    android:layout_height="match_parent"
    android:orientation="vertical">

    <ImageButton
        android:id="@+id/btn1"
        android:layout_width="wrap_content"
        android:layout_height="wrap_content"
        android:layout_gravity="center_horizontal"
        android:src="@drawable/strawberry"
        android:onClick="mOnclick"/>

    <ImageButton
        android:id="@+id/btn2"
        android:layout_width="wrap_content"
        android:layout_height="wrap_content"
        android:layout_gravity="center_horizontal"
        android:src="@drawable/watermelon"
        android:onClick="mOnclick"/>

    <ImageView
        android:id="@+id/img1"
        android:layout_width="match_parent"
        android:layout_height="match_parent"
        android:src="@drawable/mov24"
        android:scaleType="centerCrop"
        android:padding="5dp"/>

    <ImageView
        android:id="@+id/img2"
        android:layout_width="match_parent"
        android:layout_height="match_parent"
        android:src="@drawable/mov05"
        android:scaleType="centerCrop"
        android:padding="5dp"/>

</LinearLayout>
- MainActivity.java
package com.example.ch1_app9imagebutton;

import androidx.appcompat.app.AppCompatActivity;

import android.os.Bundle;
import android.view.View;
import android.widget.ImageButton;
import android.widget.ImageView;

public class MainActivity extends AppCompatActivity {

    //전역 변수 선언
    ImageButton btn1, btn2;
    ImageView img1, img2;

    @Override
    protected void onCreate(Bundle savedInstanceState) {
        super.onCreate(savedInstanceState);
        setContentView(R.layout.activity_main);

        //LinearLayout 태그 속성 객체로 가져오기
        btn1 = (ImageButton)findViewById(R.id.btn1);
        btn2 = (ImageButton)findViewById(R.id.btn2);
        img1 = (ImageView)findViewById(R.id.img1);
        img2 = (ImageView)findViewById(R.id.img2);
    }

    /**
     * 이벤트 메서드
     * (xml 위젯에서 호출)
     * @param view
     */
    public void mOnclick(View view) {
        ImageButton btn = (ImageButton)view;
        changeImage(btn.getId());
    }

    /**
     * 이미지 바꾸는 메서드
     * @param id
     */
    void changeImage(int id) {
        if(id == R.id.btn1) {
            img1.setVisibility(View.GONE); //공간없어짐
            img2.setVisibility(View.VISIBLE); //INVISIBLE : 공간은 남고 안보임
        }else if(id == R.id.btn2) {
            img1.setVisibility(View.VISIBLE);
            img2.setVisibility(View.GONE);
        }
    }

}

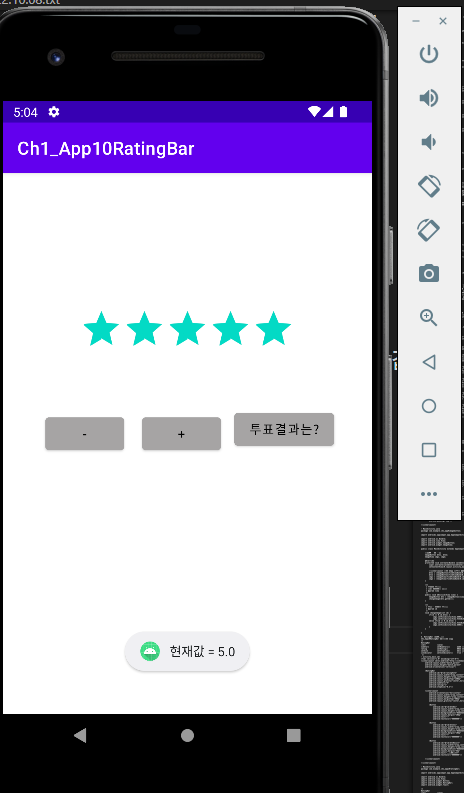
5. RatingBar (별점투표)
- RatingBar
(xml) (java)
numStars setNumStars() 별의 개수
rating setRating() 기본 평점지정
setSize setStepSize() 스텝 크기지정
isIndicator setIsIndicator() true - 입력 받을 수 있음, false - 입력 받을 수 없음
- activity_main.xml
<?xml version="1.0" encoding="utf-8"?>
<LinearLayout xmlns:android="http://schemas.android.com/apk/res/android"
    android:layout_width="match_parent"
    android:layout_height="match_parent"
    android:orientation="vertical">

    <RatingBar
        android:id="@+id/ratingVote"
        android:layout_width="wrap_content"
        android:layout_height="wrap_content"
        android:layout_marginTop="150dp"
        android:layout_gravity="center_horizontal"
        android:numStars="5"
        android:rating="1"
        android:stepSize="0.2"/>

    <LinearLayout
        android:orientation="horizontal"
        android:layout_width="wrap_content"
        android:layout_height="wrap_content"
        android:layout_marginTop="50dp"
        android:layout_gravity="center_horizontal">

        <Button
            android:id="@+id/btnDec"
            android:layout_width="wrap_content"
            android:layout_height="wrap_content"
            android:backgroundTint="#A6A4A4"
            android:layout_margin="10dp"
            android:text="-"
            android:textColor="#000000"/>

        <Button
            android:id="@+id/btnInc"
            android:layout_width="wrap_content"
            android:layout_height="wrap_content"
            android:backgroundTint="#A6A4A4"
            android:layout_margin="10dp"
            android:text="+"
            android:textColor="#000000"/>

        <Button
            android:id="@+id/btnResult"
            android:layout_width="wrap_content"
            android:layout_height="wrap_content"
            android:backgroundTint="#A6A4A4"
            android:layout_margin="5dp"
            android:text="투표결과는?"
            android:textColor="#000000"/>

    </LinearLayout>

</LinearLayout>
- MainActivity.java
package com.example.ch1_app10ratingbar;

import androidx.appcompat.app.AppCompatActivity;

import android.os.Bundle;
import android.view.View;
import android.widget.Button;
import android.widget.RatingBar;
import android.widget.Toast;

/*
RatingBar
(xml)           (java)
numStars        setNumStars()       별의 개수
rating          setRating()         기본 평점지정
setSize         setStepSize()       스텝 크기지정
isIndicator     setIsIndicator()    true - 입력 받을 수 있음, false - 입력 받을 수 없음
 */
public class MainActivity extends AppCompatActivity {

    //전역 변수
    RatingBar ratingBar;

    @Override
    protected void onCreate(Bundle savedInstanceState) {
        super.onCreate(savedInstanceState);
        setContentView(R.layout.activity_main);

        //LinearLayout 태그 속성 객체로 가져오기
        ratingBar = (RatingBar)findViewById(R.id.ratingVote);
        Button inc = (Button)findViewById(R.id.btnInc);
        Button dec = (Button)findViewById(R.id.btnDec);
        Button result = (Button)findViewById(R.id.btnResult);

        //이벤트 메서드
        inc.setOnClickListener(new View.OnClickListener() {//별 증가
            @Override
            public void onClick(View view) {
                ratingBar.incrementProgressBy(1);
            }
        });
        dec.setOnClickListener(new View.OnClickListener() {//별 감소
            @Override
            public void onClick(View view) {
                ratingBar.incrementProgressBy(-1);
            }
        });
        result.setOnClickListener(new View.OnClickListener() {//결과 값 알림 Toast
            @Override
            public void onClick(View view) {
                Toast.makeText(getApplicationContext(), "현재값 = " + ratingBar.getRating(), Toast.LENGTH_SHORT).show();
            }
        });
    }

}
6. LinearLayout
Ch2_App1LinearLayout 프로젝트 생성
android:layout_weight="" 속성은 weight 속성에 값들을 가진 것들의 합에서의 비율을 나타낸다.
ex) android:layout_weight="1" android:layout_weight="3" android:layout_weight="6" 이면 각 1/10, 3/10, 6/10
- activity_main.xml
<?xml version="1.0" encoding="utf-8"?>
<LinearLayout xmlns:android="http://schemas.android.com/apk/res/android"
    android:layout_width="match_parent"
    android:layout_height="match_parent"
    android:orientation="vertical"
    android:padding="10dp">

    <LinearLayout
        android:layout_width="match_parent"
        android:layout_height="wrap_content"
        android:orientation="horizontal"
        android:layout_marginTop="30dp">

        <Button
            android:layout_width="wrap_content"
            android:layout_height="wrap_content"
            android:text="weight=1"
            android:backgroundTint="#F0675D"
            android:layout_weight="1"/>

        <Button
            android:layout_width="wrap_content"
            android:layout_height="wrap_content"
            android:text="weight=1"
            android:backgroundTint="#009688"
            android:layout_weight="1"/>

        <Button
            android:layout_width="wrap_content"
            android:layout_height="wrap_content"
            android:text="weight=3"
            android:backgroundTint="#FFC107"
            android:layout_weight="3"/>

    </LinearLayout>

    <LinearLayout
        android:layout_width="match_parent"
        android:layout_height="match_parent"
        android:orientation="vertical"
        android:layout_marginTop="10dp">

        <Button
            android:layout_width="wrap_content"
            android:layout_height="wrap_content"
            android:backgroundTint="#F44336"
            android:text="weight=1"
            android:layout_weight="1"/>

        <Button
            android:layout_width="wrap_content"
            android:layout_height="wrap_content"
            android:backgroundTint="#4CAF50"
            android:text="weight=1"
            android:layout_weight="1"/>

    </LinearLayout>

</LinearLayout>
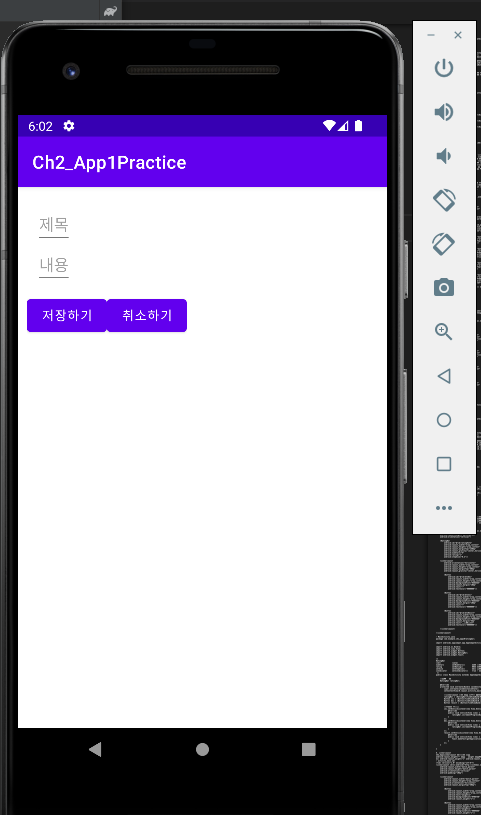
7. LinearLayout 실습
Ch2_App1Practice 프로젝트 생성
- activity_main.xml
<?xml version="1.0" encoding="utf-8"?>
<LinearLayout xmlns:android="http://schemas.android.com/apk/res/android"
    android:layout_width="match_parent"
    android:layout_height="match_parent"
    android:orientation="vertical"
    android:padding="10dp">

    <LinearLayout xmlns:android="http://schemas.android.com/apk/res/android"
        android:layout_width="wrap_content"
        android:layout_height="wrap_content"
        android:orientation="vertical"
        android:padding="10dp">

        <EditText
            android:layout_width="match_parent"
            android:layout_height="wrap_content"
            android:hint="제목"/>

        <EditText
            android:layout_width="match_parent"
            android:layout_height="match_parent"
            android:hint="내용"/>

    </LinearLayout>

    <LinearLayout
        android:layout_width="wrap_content"
        android:layout_height="wrap_content"
        android:orientation="horizontal">

        <Button
            android:layout_width="wrap_content"
            android:layout_height="wrap_content"
            android:text="저장하기"
            android:layout_weight="1"/>

        <Button
            android:layout_width="wrap_content"
            android:layout_height="wrap_content"
            android:text="취소하기"
            android:layout_weight="1"/>

    </LinearLayout>

</LinearLayout>
직접 실습한 소스다.
8. Layout을 자바에서 적용
Ch2_App2LayoutJava 프로젝트 생성
- MainActivity.java
package com.example.ch2_app2layoutjava;

import androidx.appcompat.app.AppCompatActivity;

import android.graphics.Color;
import android.os.Bundle;
import android.view.Gravity;
import android.widget.Button;
import android.widget.LinearLayout;
import android.widget.TextView;

public class MainActivity extends AppCompatActivity {

    @Override
    protected void onCreate(Bundle savedInstanceState) {
        super.onCreate(savedInstanceState);
        //setContentView(R.layout.activity_main);

        //1. 파라미터 설정
        LinearLayout.LayoutParams params1 = new LinearLayout.LayoutParams(
            LinearLayout.LayoutParams.WRAP_CONTENT,
            LinearLayout.LayoutParams.WRAP_CONTENT
        );
        LinearLayout.LayoutParams params2 = new LinearLayout.LayoutParams(
            LinearLayout.LayoutParams.MATCH_PARENT,
            LinearLayout.LayoutParams.WRAP_CONTENT
        );

        //2. 레이아웃
        LinearLayout linearLayout = new LinearLayout(this);
        linearLayout.setOrientation(LinearLayout.VERTICAL);
        linearLayout.setGravity(Gravity.CENTER);
        linearLayout.setBackgroundColor(Color.LTGRAY);

        //3. 버튼 생성
        Button btn = new Button(this);
        btn.setText("버튼");
        btn.setGravity(Gravity.CENTER);
        btn.setBackgroundColor(Color.rgb(100, 150, 200));
        btn.setLayoutParams(params1);

        //margin 적용
        params1.bottomMargin = 100;
        btn.setLayoutParams(params1);

        //4. TextView 생성
        TextView tv = new TextView(this);
        tv.setText("텍스트뷰입니다.");
        tv.setGravity(Gravity.CENTER);
        tv.setLayoutParams(params2);

        //5. 레이아웃에 추가
        linearLayout.addView(btn);
        linearLayout.addView(tv);

        //6. 출력
        setContentView(linearLayout);
    }

}

9. 상대 레이아웃 배치
기준 위젯을 기준으로 상대적인 레이아웃 배치
Ch2_App3RelativeLayout 프로젝트 생성
RelativeLayout 태그 생성.
- activity_main.xml
<?xml version="1.0" encoding="utf-8"?>
<RelativeLayout xmlns:android="http://schemas.android.com/apk/res/android"
    android:layout_width="match_parent"
    android:layout_height="match_parent">

    <Button
        android:layout_width="wrap_content"
        android:layout_height="wrap_content"
        android:text="위쪽"
        android:layout_alignParentLeft="true"
        android:layout_alignParentTop="true"
        android:layout_marginTop="100dp"
        android:layout_marginLeft="50dp"/>

    <Button
        android:layout_width="wrap_content"
        android:layout_height="wrap_content"
        android:text="좌측"
        android:layout_marginLeft="50dp"
        android:layout_centerVertical="true"
        android:layout_alignParentLeft="true"/>

    <Button
        android:layout_width="wrap_content"
        android:layout_height="wrap_content"
        android:text="중앙"
        android:layout_centerInParent="true"/>

    <Button
        android:layout_width="wrap_content"
        android:layout_height="wrap_content"
        android:text="우측"
        android:layout_marginRight="50dp"
        android:layout_centerVertical="true"
        android:layout_alignParentRight="true"/>

    <Button
        android:layout_width="wrap_content"
        android:layout_height="wrap_content"
        android:text="우하단"
        android:layout_alignParentRight="true"
        android:layout_alignParentBottom="true"/>

    <Button
        android:layout_width="wrap_content"
        android:layout_height="wrap_content"
        android:text="우상단"
        android:layout_alignParentRight="true"
        android:layout_alignParentTop="true"/>

</RelativeLayout>

10. 상대 레이아웃 배치2
Ch2_App4RelativeLayout 프로젝트 생성
- activity_main.xml
<?xml version="1.0" encoding="utf-8"?>
<RelativeLayout xmlns:android="http://schemas.android.com/apk/res/android"
    android:layout_width="match_parent"
    android:layout_height="match_parent">

    <Button
        android:id="@+id/baseBtn"
        android:layout_width="150dp"
        android:layout_height="150dp"
        android:text="기준위젯"
        android:textColor="#FFFFFF"
        android:backgroundTint="#009688"
        android:layout_centerInParent="true"/>

    <Button
        android:id="@+id/btn1"
        android:layout_width="wrap_content"
        android:layout_height="wrap_content"
        android:text="1번"
        android:textColor="#FFFFFF"
        android:backgroundTint="#A5A6A6"
        android:layout_margin="5px"
        android:layout_toLeftOf="@+id/baseBtn"
        android:layout_alignTop="@+id/baseBtn"/>

    <Button
        android:id="@+id/btn2"
        android:layout_width="wrap_content"
        android:layout_height="wrap_content"
        android:text="2번"
        android:textColor="#FFFFFF"
        android:backgroundTint="#A5A6A6"
        android:layout_margin="5px"
        android:layout_toLeftOf="@+id/baseBtn"
        android:layout_alignBaseline="@+id/baseBtn"/>

    <Button
        android:id="@+id/btn3"
        android:layout_width="wrap_content"
        android:layout_height="wrap_content"
        android:text="3번"
        android:textColor="#FFFFFF"
        android:backgroundTint="#A5A6A6"
        android:layout_margin="5px"
        android:layout_toLeftOf="@+id/baseBtn"
        android:layout_alignBottom="@+id/baseBtn"/>

    <Button
        android:id="@+id/btn4"
        android:layout_width="wrap_content"
        android:layout_height="wrap_content"
        android:text="4번"
        android:textColor="#FFFFFF"
        android:backgroundTint="#A5A6A6"
        android:layout_margin="5px"
        android:layout_above="@+id/baseBtn"
        android:layout_alignLeft="@+id/baseBtn"/>

    <Button
        android:id="@+id/btn5"
        android:layout_width="wrap_content"
        android:layout_height="wrap_content"
        android:text="5번"
        android:textColor="#FFFFFF"
        android:backgroundTint="#A5A6A6"
        android:layout_margin="5px"
        android:layout_below="@+id/baseBtn"
        android:layout_alignRight="@+id/baseBtn"/>

    <Button
        android:id="@+id/btn6"
        android:layout_width="wrap_content"
        android:layout_height="wrap_content"
        android:text="6번"
        android:textColor="#FFFFFF"
        android:backgroundTint="#A5A6A6"
        android:layout_margin="5px"
        android:layout_above="@+id/baseBtn"
        android:layout_toRightOf="@+id/btn4"/>

</RelativeLayout>

11. TableLayout
Ch2_App5_TableLayout 프로젝트 생성
TableRow 태그는 tr 태그로 보면 된다.
android:stretchColumns="0,1,2"은 0, 1, 2 컬럼 인덱스를 설정한다. (TableLayout 태그에서 사용 가능)
- activity_main.xml
<?xml version="1.0" encoding="utf-8"?>
<TableLayout xmlns:android="http://schemas.android.com/apk/res/android"
    android:layout_width="match_parent"
    android:layout_height="match_parent">

    <TableRow>
        <Button
            android:layout_height="wrap_content"
            android:layout_width="wrap_content"
            android:backgroundTint="#A5A2A2"
            android:layout_margin="5dp"
            android:textColor="#000000"
            android:text="예"/>
        <Button
            android:layout_height="wrap_content"
            android:layout_width="wrap_content"
            android:backgroundTint="#A5A2A2"
            android:layout_margin="5dp"
            android:textColor="#000000"
            android:text="아니오"/>
        <Button
            android:layout_height="wrap_content"
            android:layout_width="wrap_content"
            android:backgroundTint="#A5A2A2"
            android:layout_margin="5dp"
            android:textColor="#000000"
            android:text="생략"/>
    </TableRow>

    <TableRow>
        <Button
            android:layout_height="wrap_content"
            android:layout_width="wrap_content"
            android:backgroundTint="#A5A2A2"
            android:layout_margin="5dp"
            android:textColor="#000000"
            android:layout_column="2"
            android:text="예"/>
        <Button
            android:layout_height="wrap_content"
            android:layout_width="wrap_content"
            android:backgroundTint="#A5A2A2"
            android:layout_margin="5dp"
            android:textColor="#000000"
            android:text="아니오"/>
    </TableRow>

    <TableRow>
        <Button
            android:layout_height="wrap_content"
            android:layout_width="wrap_content"
            android:backgroundTint="#A5A2A2"
            android:layout_margin="5dp"
            android:textColor="#000000"
            android:text="예"/>
        <Button
            android:layout_height="wrap_content"
            android:layout_width="wrap_content"
            android:backgroundTint="#A5A2A2"
            android:layout_margin="5dp"
            android:textColor="#000000"
            android:text="생략"/>
        <Button
            android:layout_height="wrap_content"
            android:layout_width="wrap_content"
            android:backgroundTint="#A5A2A2"
            android:layout_margin="5dp"
            android:textColor="#000000"
            android:text="종료"/>
        <Button
            android:layout_height="wrap_content"
            android:layout_width="wrap_content"
            android:backgroundTint="#A5A2A2"
            android:layout_margin="5dp"
            android:textColor="#000000"
            android:text="아니오"/>
    </TableRow>

    <TableRow>
        <Button
            android:layout_height="wrap_content"
            android:layout_width="wrap_content"
            android:backgroundTint="#A5A2A2"
            android:layout_margin="5dp"
            android:textColor="#000000"
            android:layout_span="3"
            android:text="예"/>
        <Button
            android:layout_height="wrap_content"
            android:layout_width="wrap_content"
            android:backgroundTint="#A5A2A2"
            android:layout_margin="5dp"
            android:textColor="#000000"
            android:text="아니오"/>
    </TableRow>

</TableLayout>
- activity_calculator.xml
(만들어놓기만 함)
'교육 정리 > 안드로이드 앱 제작(Java)' 카테고리의 다른 글
| 6일차. 데이터 저장과 관리2, 파일, 서비스, 브로드캐스트, 프로바이더, 맵 (2) | 2022.11.12 |
|---|---|
| 5일차. 프래그먼트, 어댑터뷰, 리사이클러, 뷰 페이저, 액티비티와 인텐트, 데이터 저장과 관리 (0) | 2022.11.05 |
| 4일차. 그래픽과 이미지 (2) | 2022.10.29 |
| 3일차. 레이아웃 익히기2, 이벤트, 고급 위젯 다루기 (2) | 2022.10.22 |
| 1일차. 안드로이드의 개요와 개발환경 설치, 안드로이드 애플리케이션, Java 문법, 기본 위젯 익히기 (0) | 2022.10.01 |


댓글