1. 웹 프론트엔드 프로젝트(Next.js) 배포하기
Github Repository에 저장된 웹 사이트 소스(Next.js)를 EC2로 가져온다.
Github 링크 : https://github.com/JSCODE-COURSE/nginx-frontend-next
GitHub - JSCODE-COURSE/nginx-frontend-next: <비전공자도 이해할 수 있는 Nginx 입문/실전> 中 예제 프로젝트
<비전공자도 이해할 수 있는 Nginx 입문/실전> 中 예제 프로젝트. Contribute to JSCODE-COURSE/nginx-frontend-next development by creating an account on GitHub.
github.com
- Ubuntu
ubuntu@ip-172-31-33-5:~$ cd /usr/share/nginx
ubuntu@ip-172-31-33-5:/usr/share/nginx$ sudo git clone https://github.com/JSCODE-COURSE/nginx-frontend-next.git
Cloning into 'nginx-frontend-next'...
remote: Enumerating objects: 24, done.
remote: Counting objects: 100% (24/24), done.
remote: Compressing objects: 100% (23/23), done.
remote: Total 24 (delta 2), reused 23 (delta 1), pack-reused 0 (from 0)
Receiving objects: 100% (24/24), 32.92 KiB | 4.70 MiB/s, done.
Resolving deltas: 100% (2/2), done.
ubuntu@ip-172-31-33-5:/usr/share/nginx$ ls
html  nginx-frontend-html  nginx-frontend-next  nginx-frontend-react
node.js는 이전에 설치했으므로, 클론받은 폴더에서 의존성(라이브러리)도 설치한 후 빌드를 진행한다.
- Ubuntu
ubuntu@ip-172-31-33-5:/usr/share/nginx$ cd nginx-frontend-next
ubuntu@ip-172-31-33-5:/usr/share/nginx/nginx-frontend-next$ sudo npm i

added 139 packages, and audited 140 packages in 16s

36 packages are looking for funding
  run `npm fund` for details

3 vulnerabilities (1 low, 1 high, 1 critical)

To address issues that do not require attention, run:
  npm audit fix

To address all issues, run:
  npm audit fix --force

Run `npm audit` for details.
ubuntu@ip-172-31-33-5:/usr/share/nginx/nginx-frontend-next$ sudo npm run build

> next@0.1.0 build
> next build

Attention: Next.js now collects completely anonymous telemetry regarding usage.
This information is used to shape Next.js' roadmap and prioritize features.
You can learn more, including how to opt-out if you'd not like to participate in this anonymous program, by visiting the following URL:
https://nextjs.org/telemetry

   ▲ Next.js 15.1.2

   Creating an optimized production build ...
 ✓ Compiled successfully
 ✓ Linting and checking validity of types
 ✓ Collecting page data
 ✓ Generating static pages (5/5)
 ✓ Collecting build traces
 ✓ Exporting (3/3)
 ✓ Finalizing page optimization

Route (app)                              Size     First Load JS
┌ ○ /                                    5.49 kB         111 kB
└ ○ /_not-found                          979 B           106 kB
+ First Load JS shared by all            105 kB
  ├ chunks/4bd1b696-20882bf820444624.js  52.9 kB
  ├ chunks/517-98ed787e5f259f2c.js       50.5 kB
  └ other shared chunks (total)          1.88 kB


○  (Static)  prerendered as static content

ubuntu@ip-172-31-33-5:/usr/share/nginx/nginx-frontend-next$ ls
README.md  app  jsconfig.json  next.config.mjs  node_modules  out  package-lock.json  package.json  postcss.config.mjs  public  tailwind.config.mjs
ubuntu@ip-172-31-33-5:/usr/share/nginx/nginx-frontend-next$ cd out
ubuntu@ip-172-31-33-5:/usr/share/nginx/nginx-frontend-next/out$ ls
404.html  _next  favicon.ico  file.svg  globe.svg  index.html  index.txt  next.svg  vercel.svg  window.svg
dist 폴더에 빌드된 파일들(HTML, CSS, JS)이 저장된다.
배포를 위해 nginx 설정 파일을 수정한다.
- Ubuntu
ubuntu@ip-172-31-33-5:/usr/share/nginx/nginx-frontend-next/out$ cd /etc/nginx/conf.d
ubuntu@ip-172-31-33-5:/etc/nginx/conf.d$ ls
default.conf
ubuntu@ip-172-31-33-5:/etc/nginx/conf.d$ sudo vi default.conf
- Ubuntu Vim
server {
    listen       80;
    server_name  localhost;

    #access_log  /var/log/nginx/host.access.log  main;

    location / {
        root   /usr/share/nginx/nginx-frontend-next/out;
        index  index.html;

    }

    #error_page  404              /404.html;

    # redirect server error pages to the static page /50x.html
    #
    error_page   500 502 503 504  /50x.html;
    location = /50x.html {
        root   /usr/share/nginx/html;
    }

    # proxy the PHP scripts to Apache listening on 127.0.0.1:80
    #
    #location ~ \.php$ {
    #    proxy_pass   http://127.0.0.1;
    #}

    # pass the PHP scripts to FastCGI server listening on 127.0.0.1:9000
    #
    #location ~ \.php$ {
    #    root           html;
    #    fastcgi_pass   127.0.0.1:9000;
    #    fastcgi_index  index.php;
    #    fastcgi_param  SCRIPT_FILENAME  /scripts$fastcgi_script_name;
    #    include        fastcgi_params;
    #}

    # deny access to .htaccess files, if Apache's document root
    # concurs with nginx's one
:wq
"location /" 부분 중괄호 안에서,
-> root /usr/share/nginx/nginx-frontend-next/out;
root 경로를 설정한다.
-> index index.html;
root 경로의 index.html 파일 그대로 응답하도록 설정을 유지한다.
문법 에러 체크 후, 재시작하여 설정 파일을 반영한다. (서비스를 중단하지 않고 변경 사항 적용)
- Ubuntu
ubuntu@ip-172-31-33-5:/etc/nginx/conf.d$ sudo nginx -t
nginx: the configuration file /etc/nginx/nginx.conf syntax is ok
nginx: configuration file /etc/nginx/nginx.conf test is successful
ubuntu@ip-172-31-33-5:/etc/nginx/conf.d$ sudo nginx -s reload
브라우저에서 http://{EC2 IP 주소}로 접속한다.
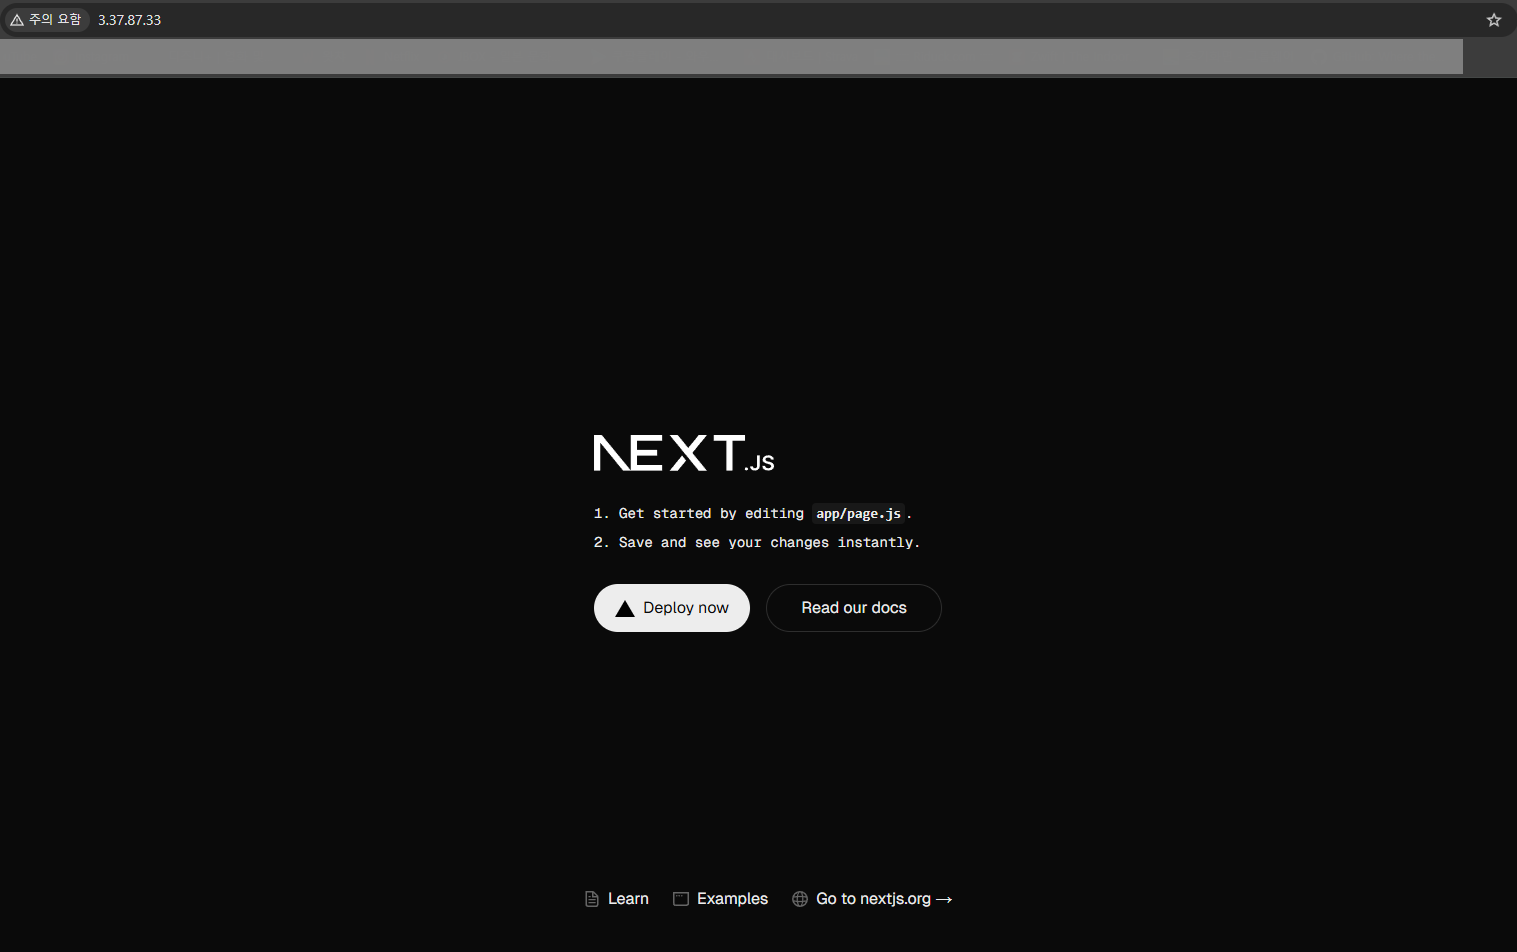
Next.js로 만든 웹 페이지를 nginx 웹 서버를 활용해서 배포했다.
참고링크 : https://www.inflearn.com/course/%EB%B9%84%EC%A0%84%EA%B3%B5%EC%9E%90%EB%8F%84-%EC%9D%B4%ED%95%B4-nginx-%EC%9E%85%EB%AC%B8-%EC%8B%A4%EC%A0%84
비전공자도 이해할 수 있는 Nginx 입문/실전| JSCODE 박재성 - 인프런 강의
현재 평점 4.8점 수강생 958명인 강의를 만나보세요. 비전공자 입장에서도 쉽게 이해할 수 있고, 실전에서 바로 적용 가능한 'Nginx 입문/실전' 강의를 만들어봤습니다! Nginx의 기본 개념, Nginx 설치
www.inflearn.com
'강의 실습 > 비전공자도 이해할 수 있는 Nginx 입문 실전' 카테고리의 다른 글
| [실습] Route 53에서 구매한 도메인 EC2에 연결하기 (0) | 2026.02.05 |
|---|---|
| 한 서버에서 다른 도메인을 가진 여러 웹 사이트를 배포하려면?! (0) | 2026.02.04 |
| [실습] 웹 프론트엔드 프로젝트(React + Vite) 배포하기 (0) | 2026.02.01 |
| [실습] 웹 프론트엔드 프로젝트(HTML, CSS, JS) 배포하기 (0) | 2026.01.30 |
| [보충 강의] Nginx 디버깅 방법 (0) | 2026.01.29 |


댓글