2. 커스텀 프로퍼티 에디터 활용
앞의 방식의 문제는 날짜 프로퍼티 값을 설정할 때마다 팩톻리 메서드 빈을 선언해야 한다는 것이다. 이런 불편한 점을 해결하기 위해 스프링 IoC 컨테이너는 프로퍼티 에디터를 도입하였다. '프로퍼티 에디터(property editor)'란, 문자열을 특정 타입의 값으로 변환해 주는 객체이다(그림 1).

스프링에서는 java.util.Date처럼 자주 사용하는 타입에 대해 몇 가지 프로퍼티 에디터를 제공한다. 날짜 형식의 문자열을 java.util.Date 객체로 변환해 주는 CustomDateEditor 클래스와 URL 형식의 문자열을 java.net.URL 객체로 변환해 주는 URLEditor 클래스 등이 있다(그림 2). 그 외 프로퍼티 에디터 클래스들은 스프링 API에서 org.springframework.beans.propertyeditors 패키지를 살펴보면 알 수 있다.

이번 실습에서는 스프링에서 제공하는 프로퍼티 에디터(CustomDateEditor)를 사용하여 날짜 프로퍼티에 값을 넣어 본다.
- 프로퍼티 에디터 등록 시나리오
프로퍼티 에디터를 사용하려면 먼저 스프링 IoC 컨테이너에 등록해야 한다. 다음 그림은 프로퍼티 에디터를 등록하는 시나리오이다(그림 3).

① 문자열을 해석하여 java.util.Date 객체를 생성해 줄 SimpleDateFormat 인스턴스를 생성한다. 문자열로 표현할 날짜 형식은 'yyyy-MM-dd'로 지정한다.
② 날짜 프로퍼티에 들어갈 값을 처리해 주는 CustomDateEditor 객체를 생성한다. 생성자를 호출할 때 두 개의 값을 넘긴다. 실제 변환 작업('String ← → Date')을 수행할 SimpleDateFormat 객체와 프로퍼티에 대해 빈(empty) 값 허용 여부이다.
③ CustomDateEditor 객체를 스프링 IoC 컨테이너에 설치하기 위해서는 에디터 등록기가 필요하다. 그 역할을 수행할 CustomPropertyEditorRegistrar 객체를 생성한다. 그리고 등록 대상(CustomDateEditor)을 설정한다.
④ List 객체에 에디터 등록기(CustomPropertyEditorRegistrar)를 넣는다.
⑤ CustomEditorConfigurer 객체에 에디터 등록기가 들어 있는 목록을 넘긴다. CustomEditorConfigurer 객체는 프로퍼티 에디터 등록기들을 실행하여, 스프링 IoC 컨테이너에 프로퍼티 에디터를 설치한다.
앞의 시나리오에 언급된 클래스 중에서 실제 프로퍼티 에디터를 빈 컨테이너에 설치하는 일을 담당하는 CustomPropertyEditorRegistrar 클래스는 우리가 작성해야 한다. 실습을 통해 확인해 본다.
- 실습 패키지 생성
exam 패키지 아래에 test16 패키지를 생성한다. test15 패키지의 모든 파일을 복사해온다.
- 프로퍼티 에디터 설치기 작성
exam.test16 패키지에 CustomPropertyEditorRegistrar 클래스를 생성하여 다음과 같이 편집한다.
package exam.test16;

import org.springframework.beans.PropertyEditorRegistrar;
import org.springframework.beans.PropertyEditorRegistry;
import org.springframework.beans.propertyeditors.CustomDateEditor;

public class CustomPropertyEditorRegistrar implements PropertyEditorRegistrar {

	CustomDateEditor customDateEditor;

	/**
	 * 셋터
	 * @param customDateEditor
	 */
	public void setCustomDateEditor(CustomDateEditor customDateEditor) {
		this.customDateEditor = customDateEditor;
	}

	/**
	 * 프로퍼티 에디터 등록
	 * @param registry
	 */
	@Override
	public void registerCustomEditors(PropertyEditorRegistry registry) {
		registry.registerCustomEditor(java.util.Date.class, customDateEditor);
	}

}
public class CustomPropertyEditorRegistrar implements PropertyEditorRegistrar {
    ...
}
프로퍼티 에디터 등록기는 스프링에서 제공하는 규칙(인터페이스)에 따라 작성해야 한다. PropertyEditorRegistrar 인터페이스가 바로 그 규칙이다(그림 4).
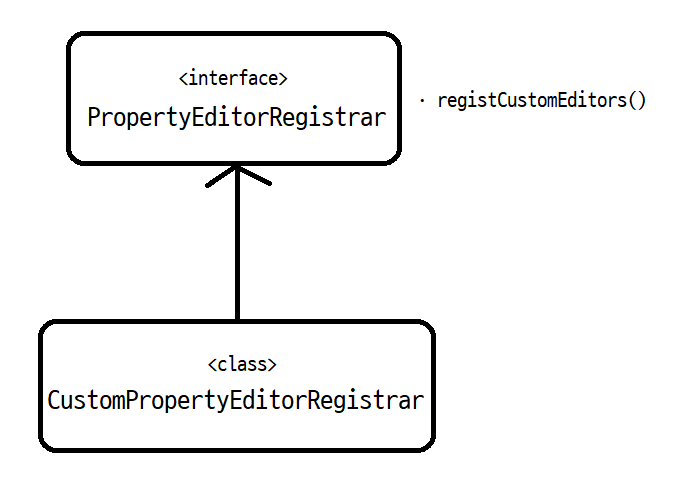
PropertyEditorRegistrar 인터페이스에는 한 개의 메서드가 선언되어 있다. 빈 컨테이너가 프로퍼티 에디터를 설치할 때 호출하는 메서드(registCustomEditors())이다. 에디터 등록기 클래스는 바로 이 메서드를 구현해야 한다.
CustomDateEditor customDateEditor;
public void setCustomDateEditor(CustomDateEditor customDateEditor) {
    this.customDateEditor = customDateEditor;
}
먼저 날짜 프로퍼티 에디터를 보관할 인스턴스 변수(CustomDateEditor)와 셋터를 정의한다.
@Override
public void registerCustomEditors(PropertyEditorRegistry registry) {
    ...
}
PropertyEditorRegistrar 인터페이스에 선언된 메서드를 구현한다. 매개변수로 넘어오는 값은 프로퍼티 에디터를 등록할 때 사용할 객체이다.
@Override
public void registerCustomEditors(PropertyEditorRegistry registry) {
    registry.registerCustomEditor(java.util.Date.class, customDateEditor);
}
매개변수로 넘어온, 즉 스프링 IoC 컨테이너가 제공해준 에디터 등록기(registry)를 사용하여 java.util.Date 타입에 대한 프로퍼티 에디터를 등록한다. 앞으로 java.util.Date 타입의 프로퍼티 값을 처리할 경우 우리가 등록한 CustomDateEditor 객체가 사용될 것이다.
- beans.xml 빈 설정 파일
exam/test16/beans.xml 파일을 열고 다음과 같이 편집한다.
<?xml version="1.0" encoding="UTF-8"?>
<beans xmlns="http://www.springframework.org/schema/beans"
	xmlns:xsi="http://www.w3.org/2001/XMLSchema-instance"
	xmlns:p="http://www.springframework.org/schema/p"
    xmlns:c="http://www.springframework.org/schema/c"
 	xsi:schemaLocation="http://www.springframework.org/schema/beans
						http://www.springframework.org/schema/beans/spring-beans.xsd">

	<bean id="dateFormat" class="java.text.SimpleDateFormat">
		<constructor-arg value="yyyy-MM-dd"/>
	</bean>

	<bean id="dateEditor" class="org.springframework.beans.propertyeditors.CustomDateEditor">
		<constructor-arg ref="dateFormat"/>
		<constructor-arg value="true"/>
	</bean>

	<bean id="customPropertyEditorRegistrar" class="exam.test16.CustomPropertyEditorRegistrar">
		<property name="customDateEditor" ref="dateEditor"/>
	</bean>

	<bean class="org.springframework.beans.factory.config.CustomEditorConfigurer">
		<property name="propertyEditorRegistrars">
			<list>
				<ref bean="customPropertyEditorRegistrar"/>
			</list>
		</property>
	</bean>


	<bean id="hankookTire" class="exam.test16.Tire">
		<property name="maker" value="Hankook"/>
		<property name="createdDate" value="2014-5-5"/>
	</bean>

	<bean id="kumhoTire" class="exam.test16.Tire">
		<property name="maker" value="Kumho"/>
		<property name="createdDate" value="2014-1-14"/>
	</bean>

</beans>
<bean id="dateFormat" class="java.text.SimpleDateFormat">
    <constructor-arg value="yyyy-MM-dd"/>
</bean>
▶ 자바 코드로 표현하면?
SimpleDateFormat dateFormat = new SimpleDateFormat("yyyy-MM-dd");
'yyyy-MM-dd' 형식의 문자열을 java.util.Date로 바꾸어 주는 SimpleDateFormat 빈을 준비한다.
<bean id="dateEditor" class="org.springframework.beans.propertyeditors.CustomDateEditor">
    <constructor-arg ref="dateFormat"/>
    <constructor-arg value="true"/>
</bean>
▶ 자바 코드로 표현하면?
CustomDateEditor dateEditor = new CustomDateEditor(dateFormat, true);
프로퍼티 편집기 CustomDateEditor 객체를 생성한다. 문자열을 날짜 객체로 바꿔 줄 빈(dateFormat)을 설정한다. 생성자의 두 번째 값은 프로퍼티에 빈 값이 들어갈 수 있는지 여부이다. true로 설정하여 빈 값을 허락한다.
<bean id="customPropertyEditorRegistrar" class="exam.test16.CustomPropertyEditorRegistrar">
    <property name="customDateEditor" ref="dateEditor"/>
</bean>
▶ 자바 코드로 표현하면?
CustomPropertyEditorRegistrar customPropertyEditorRegistrar = new CustomPropertyEditorRegistrar();
customPropertyEditorRegistrar.setCustomDateEditor(dateEditor);
우리가 만든 프로퍼티 에디터 등록기 'CustomPropertyEditorRegistrar'의 인스턴스를 준비한다. 그리고 날짜 값을 처리할 프로퍼티 에디터를 설정한다.
<bean class="org.springframework.beans.factory.config.CustomEditorConfigurer">
    <property name="propertyEditorRegistrars">
        <list>
            <ref bean="customPropertyEditorRegistrar"/>
        </list>
    </property>
</bean>
▶ 자바 코드로 표현하면?
CustomEditorConfigurer tempConfigurer = new CustomEditorConfigurer();
List tempList = new ArrayList();
tempList.add(customPropertyEditorRegistrar);
tempConfigurer.setPropertyEditorRegistrars(tempList);
마지막으로 CustomEditorConfigurer 객체를 생성하여 프로퍼티 에디터 등록기를 설정한다. 이 객체를 선언할 때는 id 속성이 없다. 우리가 따로 참조할 일이 없기 때문이다. 스프링 IoC 컨테이너는 타입으로 이 객체를 찾기 때문에 id를 지정하지 않아도 문제없다. 프로퍼티 에디터 등록기는 목록(List)에 담아서 propertyEditorRegistrars 속성값으로 지정한다.
<bean id="hankookTire" class="exam.test16.Tire">
    <property name="maker" value="Hankook"/>
    <property name="createdDate" value="2014-5-5"/>
</bean>
▶ 자바 코드로 표현하면?
Tire hankookTire = new Tire();
hankookTire.setMaker("Hankook");
hankookTire.setCreatedDate(dateFormat.parse("2014-5-5"));
날짜 타입에 대해 프로퍼티 에디터를 등록해 두면 앞의 코드와 같이 날짜 값을 간결하게 설정할 수 있다. 프로퍼티 에디터 등록 과정이 추가되어 조금 복잡해져서 그렇지, 이전 방식과 비교하면 엄청 간단히 날짜 값을 설정할 수 있다.
- 빈 컨테이너 테스트
createdDate 프로퍼티에 설정한 날짜 값이 정확히 들어갔는지 확인해 본다. test15 패키지에서 복사해 온 테스트 클래스 exam.test16.Test 클래스를 다음과 같이 편집한다.
package exam.test16;

import java.text.SimpleDateFormat;

import org.springframework.context.support.ClassPathXmlApplicationContext;

public class Test {

	public static void main(String[] args) {
		//IoC 컨테이너 준비하여 빈 생성
		ClassPathXmlApplicationContext ctx = new ClassPathXmlApplicationContext("exam/test16/beans.xml");

		System.out.println("[CustomDateEditor 활용]-------------------------");

		SimpleDateFormat dateFormat = (SimpleDateFormat)ctx.getBean("dateFormat");

		Tire hankookTire = (Tire)ctx.getBean("hankookTire");
		System.out.println(hankookTire.getMaker());
		System.out.println(dateFormat.format(hankookTire.getCreatedDate()));

		System.out.println("------------------------------");

		Tire kumhoTire = (Tire) ctx.getBean("kumhoTire");
		System.out.println(kumhoTire.getMaker());
		System.out.println(dateFormat.format(kumhoTire.getCreatedDate()));
	}

}
빈 설정 파일의 폴더 이름(test16)과 출력 문구가 변경되었다. 나머지 코드는 이전 코드와 같다. 실행 결과도 이전과 동일하게 나온다.
날짜 타입 외에 다른 타입에 대해서도 이번 실습에서처럼 프로퍼티 에디터 편집기를 준비하고 등록기를 작성하면 아무런 문제 없이 프로퍼티 값을 처리할 수 있을 것이다.
참고도서 : https://freelec.co.kr/book/1674/
[열혈강의] 자바 웹 개발 워크북
[열혈강의] 자바 웹 개발 워크북
freelec.co.kr
'교재 실습 > 자바 웹 개발 워크북' 카테고리의 다른 글
| 148. 어노테이션을 이용한 의존 객체 자동 주입 (2) (2) | 2022.11.10 |
|---|---|
| 147. 어노테이션을 이용한 의존 객체 자동 주입 (1) (0) | 2022.11.09 |
| 145. 날짜 값 주입 (1) (1) | 2022.11.07 |
| 144. 빈의 범위 설정 (0) | 2022.11.07 |
| 143. 팩토리 메서드와 팩토리 빈 (2) (1) | 2022.11.06 |


댓글