- 빈 컨테이너 테스트
생성자 호출을 테스트하는 exam.test04.Test 클래스를 다음과 같이 편집한다.
package exam.test04;

import org.springframework.context.support.ClassPathXmlApplicationContext;

public class Test {

	public static void main(String[] args) {
		//IoC 컨테이너 준비하여 빈 생성
		ClassPathXmlApplicationContext ctx = new ClassPathXmlApplicationContext("exam/test04/beans.xml");

		Score score1 = (Score)ctx.getBean("score1");
		System.out.println(score1);
		//System.out.println(score1.name + ", " + score1.kor + ", " + score1.eng + ", " + score1.math);

		Score score2 = (Score)ctx.getBean("score2");
		System.out.println(score2);
		//System.out.println(score2.name + ", " + score2.kor + ", " + score2.eng + ", " + score2.math);

		Score score3 = (Score)ctx.getBean("score3");
		System.out.println(score3);
		//System.out.println(score3.name + ", " + score3.kor + ", " + score3.eng + ", " + score3.math);

		Score score4 = (Score)ctx.getBean("score4");
		System.out.println(score4);
		//System.out.println(score4.name + ", " + score4.kor + ", " + score4.eng + ", " + score4.math);

		Score score5 = (Score)ctx.getBean("score5");
		System.out.println(score5);
		//System.out.println(score5.name + ", " + score5.kor + ", " + score5.eng + ", " + score5.math);
	}

}
beans.xml에 선언된 빈의 생성자가 제대로 호출되었는지 확인하기 위해 해당 객체를 꺼내서 출력해 본다. 결과는 다음과 같다(그림 1).
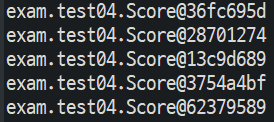
빈 값의 주소값이 나오게 되는데 Score 클래스를 아직 변경하지 않았기 때문이다.
- Score 클래스 변경
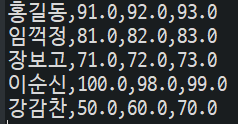
Test 클래스의 실행 결과를 "이름,국어,영어,수학" 형식으로 출력하려면 Score 클래스의 toString() 메서드를 재정의(Overriding)한다.
exam.test04.Score 클래스에 다음과 같이 toString() 메서드를 추가한다.
public class Score {

	String name;
	float kor;
	float eng;
	float math;

	public Score() {}

	public Score(String name, float kor, float eng, float math) {
		this.name = name;
		this.kor = kor;
		this.eng = eng;
		this.math = math;
	}

	@Override
	public String toString() {
		return name + "," + kor + "," + eng + "," + math;
	}
	...
}
이후 다시 exam.test04.Test 클래스를 실행한다(그림 2).
2. 프로퍼티 설정
빈 설정 파일에서 인스턴스를 선언할 때 생성자처럼 프로퍼티 값을 설정할 수 있다. 프로퍼티 값을 지정할 때는 <property> 태그를 사용한다.
※ 필드와 프로퍼티
인스턴스 변수는 필드(field) 또는 속성(attribute)이라고도 부른다. 프로퍼티(property)는 셋터(setter)/겟터(getter) 메서드를 가리키는 용어이다. 다음 클래스 코드를 본다.
class Member {
    int _no;
    String _name;
    public void setNo(int no) {this._no = no;}
    public int getNo() {return this._no;}
    public void setName(String name) {this._name = name;}
    public String getName() {return this._name;}
}
위 코드에서 필드는 _no, _name 이다. 프로퍼티는 getNo()/setNo(), getName(), setName() 이다. 프로퍼티 이름은 셋터/겟터 메서드에서 set/get을 빼고, 나머지 이름에서 첫 글자를 소문자로 한 이름이다. 즉 Member 클래스의 프로퍼티는 no와 name 이다. 필드(또는 속성)와 프로퍼티를 혼동하지 않길 바란다.
- 실습 패키지 생성
exam 패키지 아래에 test05 패키지를 생성한다. test04 패키지의 모든 파일을 test05 패키지에 복사한다.
- beans.xml 빈 설정 파일
exam/test05/beans.xml 파일을 열고 다음과 같이 편집한다.
<?xml version="1.0" encoding="UTF-8"?>
<beans xmlns="http://www.springframework.org/schema/beans"
	xmlns:xsi="http://www.w3.org/2001/XMLSchema-instance"
 	xsi:schemaLocation="http://www.springframework.org/schema/beans
						http://www.springframework.org/schema/beans/spring-beans.xsd">

	<bean id="score1" class="exam.test05.Score">
		<property name="name"><value>홍길동</value></property>
		<property name="kor"><value>100</value></property>
		<property name="eng"><value>95</value></property>
		<property name="math"><value>90</value></property>
	</bean>

	<bean id="score2" class="exam.test05.Score">
		<property name="name" value="임꺽정"/>
		<property name="kor" value="85"/>
		<property name="eng" value="99"/>
		<property name="math" value="100"/>
	</bean>

</beans>
<property name="name"><value>홍길동</value></property>
<property name="kor"><value>100</value></property>
<property name="eng"><value>95</value></property>
<property name="math"><value>90</value></property>▶ 자바 코드로 표현하면?
Score score1 = new Score();
score1.setName("홍길동");
score1.setKor(100);
score1.setEng(95);
score1.setMath(90);빈의 프로퍼티 값을 설정할 때는 <property> 태그를 선언한다. <property> 태그의 name 속성은 프로퍼티 이름을 설정하고, 자식 태그 <value> 태그는 프로퍼티 값을 설정한다.
<property name="name" value="임꺽정"/>
<property name="kor" value="85"/>
<property name="eng" value="99"/>
<property name="math" value="100"/>
▶ 자바 코드로 표현하면?
Score score2 = new Score();
score2.setName("임꺽정");
score2.setKor(85);
score2.setEng(99);
score2.setMath(100);<constructor-arg> 태그와 마찬가지로 <value> 태그를 사용하는 대신 <property> 태그의 value 속성을 사용하여 프로퍼티 값을 설정할 수 있다.
- 빈 컨테이너 테스트
프로퍼티를 테스트하는 exam.test05.Test 클래스를 다음과 같이 편집한다.
package exam.test05;

import org.springframework.context.support.ClassPathXmlApplicationContext;

public class Test {

	public static void main(String[] args) {
		//IoC 컨테이너 준비하여 빈 생성
		ClassPathXmlApplicationContext ctx = new ClassPathXmlApplicationContext("exam/test05/beans.xml");

		Score score1 = (Score)ctx.getBean("score1");
		System.out.println(score1);

		Score score2 = (Score)ctx.getBean("score2");
		System.out.println(score2);
	}

}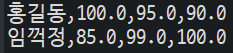
출력 결과를 보면 빈 설정 파일에 지정한 대로 각각의 프로퍼티 값이 제대로 인스턴스에 설정된 것을 확인할 수 있다.
참고도서 : https://freelec.co.kr/book/1674/
[열혈강의] 자바 웹 개발 워크북
[열혈강의] 자바 웹 개발 워크북
freelec.co.kr
'교재 실습 > 자바 웹 개발 워크북' 카테고리의 다른 글
| 138. 의존 객체 주입 (1) (0) | 2022.10.23 |
|---|---|
| 137. 생성자와 프로퍼티 설정 (3) (0) | 2022.10.21 |
| 135. 생성자와 프로퍼티 설정 (1) (0) | 2022.10.19 |
| 134. XML 기반 빈 관리 컨테이너 (4) (3) | 2022.10.19 |
| 133. XML 기반 빈 관리 컨테이너 (3) (0) | 2022.10.17 |


댓글